
As the days grow shorter and the air carries that unmistakable hint of fall, a culinary challenge brews in my kitchen: It’s time to conjure up something delightfully spooky! Enter my Halloween Oreo Cookie Boo Brownies—your new go-to sweet treat for both hauntingly fun gatherings and cozy nights in. These brownies bring together the rich satisfaction of homemade chocolate goodness with an easy prep process that even the busiest of home chefs can manage. Infused with crushed Oreos, each bite delivers a delightful crunch, while their festive toppings create an inviting vibe. Whether you’re hosting a Halloween party or just want to indulge in something special, these brownies make a bewitching addition. Ready to summon up some Halloween magic in your kitchen? Let’s dive into the recipe!

Why are Halloween Oreo Brownies a must-try?
Festive Appeal: These brownies are not just delicious but also add a spooky aesthetic to your Halloween celebrations. Easy Preparation: With simple steps, even novice bakers can whip these up without a hitch. Decadent Flavor: The combination of rich chocolate and crunchy Oreos creates an irresistible treat. Crowd-Pleaser: Perfect for parties or cozy nights, everyone will adore these spooky delights. If you love creative desserts, check out my Oreo Cheesecake Cookie for another fun twist!
Halloween Oreo Brownies Ingredients
• Get ready to whip up something magical!
For the Brownies
- Oreo Cookies – Infuse your brownies with festive flair by using Halloween-themed Oreos for that extra spooky twist.
- All-Purpose Flour – Provides the structure your brownies need; swap in gluten-free flour to make them accessible for everyone.
- Cocoa Powder – Opt for unsweetened cocoa to amplify that rich, chocolatey flavor we all crave.
- Granulated Sugar – Sweetens your treats; consider using brown sugar for an extra chewy texture in your brownies.
- Eggs – No substitutes here! Essential for binding and moisture, ensuring a perfect fudgy consistency.
- Butter – Adds depth and moisture; feel free to use coconut oil for a delightful dairy-free alternative.
- Chocolate Chips – Choose semi-sweet or dark chocolate to throw in melty pockets of joy, enriching the chocolate flavor of your Halloween Oreo brownies.
For the Topping
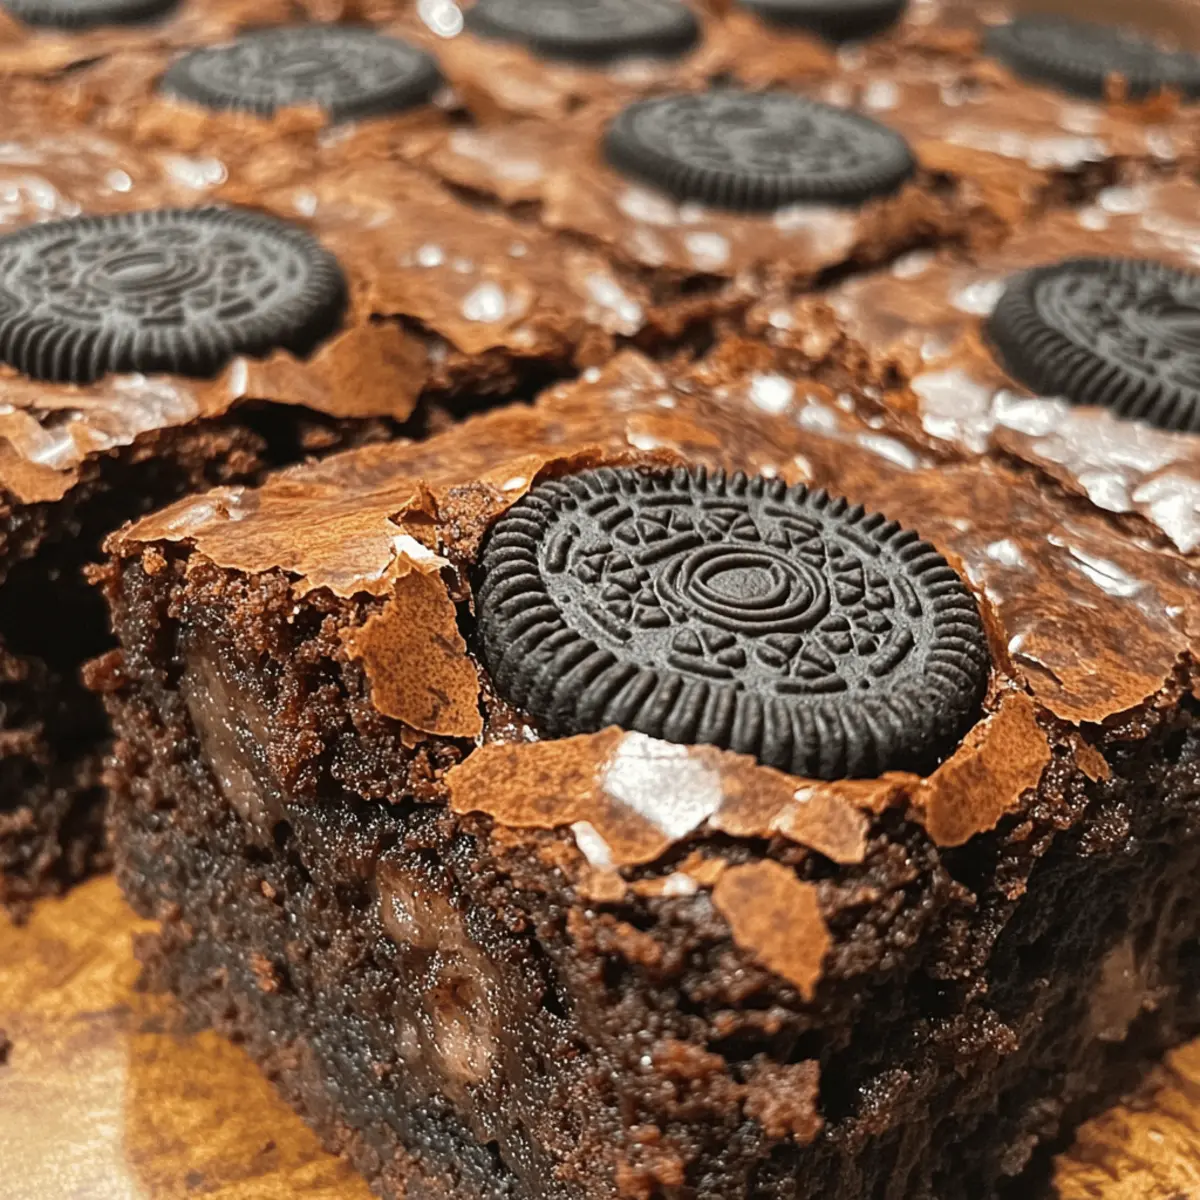
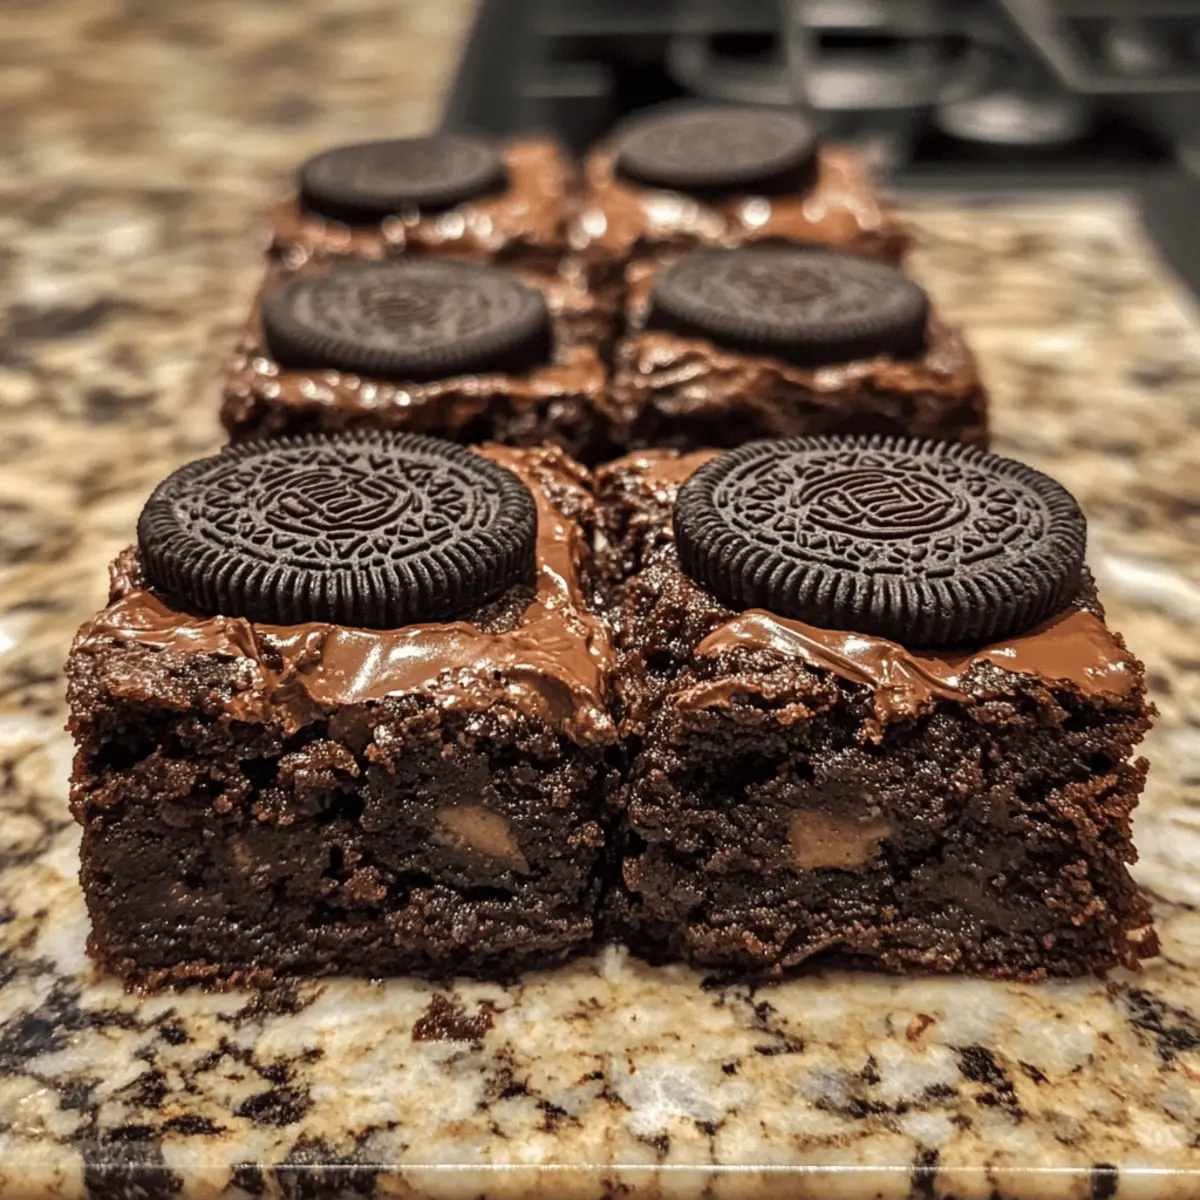
- Whole Oreo Cookies – Leaving these whole on top not only boosts visual appeal but also enhances the spooky factor of your delightful Halloween treats.
Step‑by‑Step Instructions for Halloween Oreo Brownies
Step 1: Preheat and Prepare
Begin by preheating your oven to 350°F (175°C). While the oven heats, line a 9×9 inch baking pan with parchment paper, allowing the paper to hang over the edges for easy removal later. This will ensure your Halloween Oreo Brownies can be lifted out cleanly once baked, making slicing a breeze!
Step 2: Mix Dry Ingredients
In a spacious mixing bowl, combine 1 cup of all-purpose flour, 1/3 cup of unsweetened cocoa powder, and 1 cup of granulated sugar. Whisk these dry ingredients together until evenly blended, achieving a uniform mixture free of lumps. This foundational step will help your brownies bake consistently and provide that rich chocolatey base you crave.
Step 3: Cream Butter and Add Eggs
Melt ½ cup of butter and allow it to cool slightly before combining it with the sugar mixture. Stir until smooth, then add in 2 large eggs, one at a time, mixing thoroughly after each addition. This creaming process will imbue your Halloween Oreo Brownies with moisture and richness, leading to that chewy texture everyone loves!
Step 4: Combine Wet and Dry Ingredients
Gradually add the dry ingredient mixture into the wet ingredients, folding them together until just combined. Be careful not to overmix; a few streaks of flour are fine. Once merged, gently fold in 1 cup of chocolate chips and 1 cup of crushed Halloween Oreos, adding festive crunch and flavor to your batter.
Step 5: Pour and Spread Batter
Transfer the brownie batter into the prepared baking pan and use a spatula to spread it evenly, reaching all corners of the pan. The batter should look thick and luscious, just waiting to be baked. Ensure it’s level in the pan for uniform baking, which is crucial for achieving that perfect fudgy texture in your Halloween Oreo Brownies.
Step 6: Decorate with Whole Oreos
Once the batter is evenly spread, decorate the top by placing whole Halloween-themed Oreo cookies right on the surface. Position them evenly spaced; this will create a spooky visual when cut and served. The cookies will partially sink during baking, giving your brownies a whimsical, eerie appearance.
Step 7: Bake
Place the brownie pan in the preheated oven and bake for approximately 32 minutes. Keep a close eye on the edges, which should look set and slightly pulling away from the pan, while the center remains soft and a bit gooey. Use a toothpick to check doneness in the center; it should come out with a few moist crumbs.
Step 8: Cool and Slice
Remove the brownies from the oven and let them cool in the pan for about 15-20 minutes. Once slightly cooled, use the parchment paper to lift them out onto a cutting board. Allow them to cool completely before slicing into squares, revealing those delightful bits of Oreo and creating the perfect treat for your Halloween celebrations!

Storage Tips for Halloween Oreo Brownies
Room Temperature: Keep the brownies in an airtight container at room temperature for up to 5 days to maintain their chewy texture and flavor.
Fridge: If you prefer your brownies chilled, store them in the fridge for up to a week; just ensure they are wrapped or in an airtight container to prevent them from drying out.
Freezer: For longer storage, freeze your Halloween Oreo brownies in a single layer, wrapped tightly in plastic wrap, for up to three months. Thaw overnight in the fridge before enjoying!
Reheating: To bring back their fudginess, microwave individual squares on low power for 10-15 seconds before serving. Enjoy that delightful meltiness again!
What to Serve with Halloween Oreo Cookie Boo Brownies?
These delightful brownies will charm your guests and complement a festive spread beautifully.
-
Vanilla Ice Cream: The creamy sweetness of vanilla ice cream balances the chocolatey richness of the brownies, creating a classic dessert experience.
-
Pumpkin Spice Latte: Warm and aromatic, this drink echoes the fall flavors and adds a cozy touch to your Halloween gatherings.
-
Spiced Apple Cider: Serve this warm, spiced beverage along with the brownies for a delightful flavor contrast that’s perfect for autumn.
-
Chocolate Dipped Strawberries: The freshness of strawberries dipped in rich chocolate brightens the table and adds a fruity element to your festive spread.
-
Ghost-Shaped Cookies: Keep the spooky spirit alive by pairing these brownies with adorable spooky cookies that will please the young and young-at-heart.
-
Caramel Sauce Drizzle: A simple drizzle of warm caramel sauce over the brownies enriches the dessert with an extra layer of sweetness and a touch of elegance.
-
Fresh Fruit Salad: A vibrant mix of seasonal fruits offers a refreshing contrast to the dense brownies while keeping the overall meal balanced.
-
Hot Chocolate: Rich, velvety hot chocolate, especially when topped with whipped cream, serves as an indulgent treat that pairs beautifully with the fudgy brownies.
These delightful accompaniments will elevate your Halloween Oreo Cookie Boo Brownies into a memorable dessert experience!
Halloween Oreo Brownies Variations & Substitutions
Feel free to get creative with your Halloween Oreo brownies—there are plenty of options to cater to your taste buds!
-
Gluten-Free: Substitute all-purpose flour with a 1:1 gluten-free flour blend for a safe and scrumptious treat.
-
Dairy-Free: Swap butter for coconut oil and use dairy-free chocolate chips to keep it rich and delicious without dairy.
-
Different Oreo Flavors: Try using different flavored Oreos, like mint or peanut butter, to give an exciting twist to your brownies.
-
Nutty Addition: Add a cup of chopped nuts, like walnuts or pecans, for extra crunch and a lovely texture contrast. They add a delightful rustic touch!
-
Extra Chocolatey: Increase the amount of chocolate chips to 1.5 cups for an even richer flavor. You can never have too much chocolate, right?
-
Spicy Kick: Add a pinch of cayenne pepper or chili powder to the batter for a playful hint of heat that pairs unexpectedly well with chocolate.
-
Swirled Fudge: Drizzle some melted chocolate or caramel on top before baking for a deliciously swirled effect that enhances both flavor and presentation.
-
Serving Suggestion: Pair your brownies with a scoop of vanilla ice cream or serve them alongside my delectable Kit Kat Brownies for a complete dessert experience! Enjoy the spooky fun in your kitchen!
Make Ahead Options
These Halloween Oreo Brownies are perfect for busy home cooks looking to save time! You can prepare the brownie batter up to 24 hours in advance by mixing the dry ingredients and combining them with the wet ingredients as instructed, then refrigerating the batter in an airtight container. This helps maintain their rich flavor and fudgy texture. On the day you plan to serve, simply take the batter out, fold in the crushed Oreos and chocolate chips, and bake as directed. This way, you’ll have delicious brownies with minimal effort, allowing you to enjoy more time with your friends and family at Halloween gatherings!
Tips for the Best Halloween Oreo Brownies
-
Don’t Overmix: When combining wet and dry ingredients, mix until just incorporated. Overmixing can lead to dense brownies instead of the fudgy texture you want.
-
Chill the Batter: If you’re in a warm kitchen, consider chilling the brownie batter for 15-20 minutes before baking. This helps maintain a thicker texture, enhancing the chewiness of your Halloween Oreo brownies.
-
Use Fresh Ingredients: Ensure your baking ingredients, especially baking powder and cocoa, are fresh for the best taste and texture. Stale ingredients can lead to less than ideal results.
-
Adjust Baking Time: Every oven is different! Check your Halloween Oreo brownies a few minutes before the recommended baking time. Look for set edges and a slightly soft center for that perfect gooeyness.
-
Add More Oreos: If you adore Oreos, don’t be shy! Toss in extra crushed Oreos or sprinkle them on top before baking to intensify the flavor and crunch factor.
Halloween Oreo Brownies Recipe FAQs
What type of Oreo cookies should I use?
You should definitely use Halloween-themed Oreo cookies to enhance the festive appeal of your brownies! However, any flavor of Oreo will work beautifully if you prefer to use the classic variety. Feel free to experiment with different flavors for a unique twist!
How should I store the Halloween Oreo Brownies?
To keep your delicious brownies fresh, store them in an airtight container at room temperature for up to 5 days. If you want to extend their shelf life, they can also be refrigerated, but be sure to cover them well to prevent drying out, which will allow them to stay tasty for up to a week.
Can I freeze Halloween Oreo Brownies?
Absolutely! You can freeze your brownies for up to three months. Just wrap individual squares tightly in plastic wrap and place them in a freezer-safe container. When you’re ready to delight in the fudgy goodness again, thaw them overnight in the fridge and microwave briefly for that fresh-from-the-oven feel!
What if my brownies are too dry?
If you accidentally bake your brownies for too long, they may turn out drier. To prevent this, always check them a few minutes before the suggested bake time. The edges should be set, while the center should retain a bit of gooiness; a toothpick inserted should come out with a few moist crumbs. If your brownies are indeed too dry, you can serve them with a scoop of vanilla ice cream, which adds a delightful contrast of creaminess!
Can I substitute any ingredients for dietary restrictions?
Certainly! If you’re aiming for a gluten-free option, just swap the all-purpose flour with a 1:1 gluten-free baking blend. For a dairy-free treat, replace the butter with coconut oil or a dairy-free margarine. You can also use egg substitutes like flax eggs if you’re looking to go egg-free. Just remember, these changes might alter the texture slightly, so it’s always a good idea to experiment!
Halloween Oreo Brownies: Chewy, Spooky Treats to Love
Ingredients
Equipment
Method
- Preheat your oven to 350°F (175°C) and line a 9x9 inch baking pan with parchment paper.
- In a bowl, whisk together flour, cocoa powder, and sugar until well mixed.
- Melt the butter, cool slightly, and then combine with the sugar mixture. Add the eggs one at a time, mixing well.
- Fold the dry ingredients into the wet mixture until combined. Gently fold in chocolate chips and crushed Oreo cookies.
- Transfer the batter to the prepared pan and spread evenly. Level off the batter with a spatula.
- Decorate with whole Oreo cookies on top, evenly spaced.
- Bake for approximately 32 minutes, checking for a soft center.
- Let cool for 15-20 minutes before lifting out to slice into squares.
Leave a Reply