
As soon as the aroma of frying katsu fills the air, it’s like an instant hug from the kitchen. My heart swells with warmth, knowing that these Authentic Japanese Katsu Bowls will soon grace our family dinner table. This recipe is a delightful fusion of crispy chicken or pork served over fluffy rice, dripping with savory sauce. Not only is it a comforting dish that satisfies the soul, but it’s also a quick weeknight dinner that any home chef can whip up in no time. And the best part? It’s easily customizable; whether you opt for traditional meat or explore vegetarian options, everyone at your table will be smiling. Curious to find out how to create this delicious experience in your own home? Let’s dive into the magic of katsu!
Why Are Katsu Bowls So Irresistible?
Crispy Perfection: The golden-brown katsu creates a delightful crunch that provides an irresistible contrast to the fluffy rice beneath.
Quick and Easy: This dish is a lifesaver for busy weekdays, requiring minimal prep and cooking time yet delivering impressive flavors.
Customizable Delight: Whether you prefer chicken, pork, or even a veggie twist with tofu, these bowls cater to every taste, promising happiness for all diners.
Comforting Flavor: Savory tonkatsu sauce drizzled over the rice and katsu adds a delicious depth that will make this dish a favorite in your home.
Family-Friendly: With the ability to adjust seasoning and toppings, you can please even the pickiest eaters, making mealtime stress-free and enjoyable.
Serve these Japanese Katsu Bowls alongside pickled vegetables or a fresh salad for a complete meal that everyone will love!
Japanese Katsu Bowls Ingredients
For the Katsu
- Chicken Breasts or Pork Loin – Main protein that provides a satisfying base; feel free to substitute with tofu or eggplant for a vegetarian option.
- Salt and Pepper – Essential seasonings that enhance the flavor of the katsu.
- All-Purpose Flour – Creates the perfect coating that helps achieve that coveted crispy exterior.
- Eggs – Binds the breadcrumbs to the meat; consider using flaxseed or aquafaba as vegan substitutes.
- Panko Breadcrumbs – Traditional choice for katsu, giving it a light, crispy texture.
- Vegetable Oil – Necessary for frying, ensuring the katsu has that delightful crispiness.
For the Rice
- Japanese Short-Grain Rice – The heart of the dish, providing a sticky and fluffy texture.
- Water – Required for cooking the rice; the amount affects the final texture.
- Rice Vinegar, Sugar, Salt – This seasoning mix ensures the rice isn’t bland, offering a subtle tang.
For the Sauce
- Tonkatsu Sauce – The main condiment, bringing a tangy and savory note; a homemade version can also be made using soy sauce, Worcestershire sauce, and ketchup.
- Soy Sauce, Worcestershire Sauce, Ketchup – Enhances flavor depth and complements the tonkatsu sauce.
For Toppings
- Shredded Cabbage – Adds freshness and a delightful crunch to each bite.
- Green Onions – Provide a pop of color and flavor.
- Sesame Seeds – Sprinkle on top for added texture and visual appeal.
- Pickled Ginger – Offers a refreshing contrast and balances the savory flavors of Japanese Katsu Bowls.
Step‑by‑Step Instructions for Japanese Katsu Bowls
Step 1: Prepare the Rice
Rinse 1 cup of Japanese short-grain rice under cold water until the water runs clear, then soak it in a bowl for 30 minutes. In a medium pot, combine the soaked rice with 1.5 cups of water, bring to a boil over medium-high heat, reduce to a gentle simmer, and cover. Cook for 15 minutes, then remove from heat and let it rest covered for another 10 minutes. Fluff the rice and fold in a mixture of rice vinegar, sugar, and salt for extra flavor.
Step 2: Prepare the Katsu
While the rice is cooking, take 1 pound of chicken breasts or pork loin and pound it to an even thickness of about ½ inch to ensure uniform cooking. Season both sides generously with salt and pepper. Set up a breading station: place all-purpose flour in one shallow dish, beaten eggs in another, and panko breadcrumbs in a third. Dredge the meat in flour, then dip in egg, and finally coat thoroughly with panko, pressing gently to adhere.
Step 3: Fry the Katsu
In a deep skillet or frying pan, heat about ½ inch of vegetable oil over medium-high heat until shimmering, around 350°F (175°C). Carefully add the breaded katsu to the hot oil, frying for 4-5 minutes on each side or until golden brown and cooked through, checking that the internal temperature reaches 165°F (75°C). Once fried, transfer the katsu to a paper towel-lined plate to drain excess oil, then slice into strips.
Step 4: Make the Sauce
In a small bowl, whisk together ¼ cup of tonkatsu sauce, 1 tablespoon of soy sauce, 1 tablespoon of Worcestershire sauce, and 1 tablespoon of ketchup. Adjust the sauce to taste, adding more ketchup for sweetness or soy sauce for saltiness, creating a balance that complements the savory katsu. Set aside to allow the flavors to meld.
Step 5: Assemble the Bowl
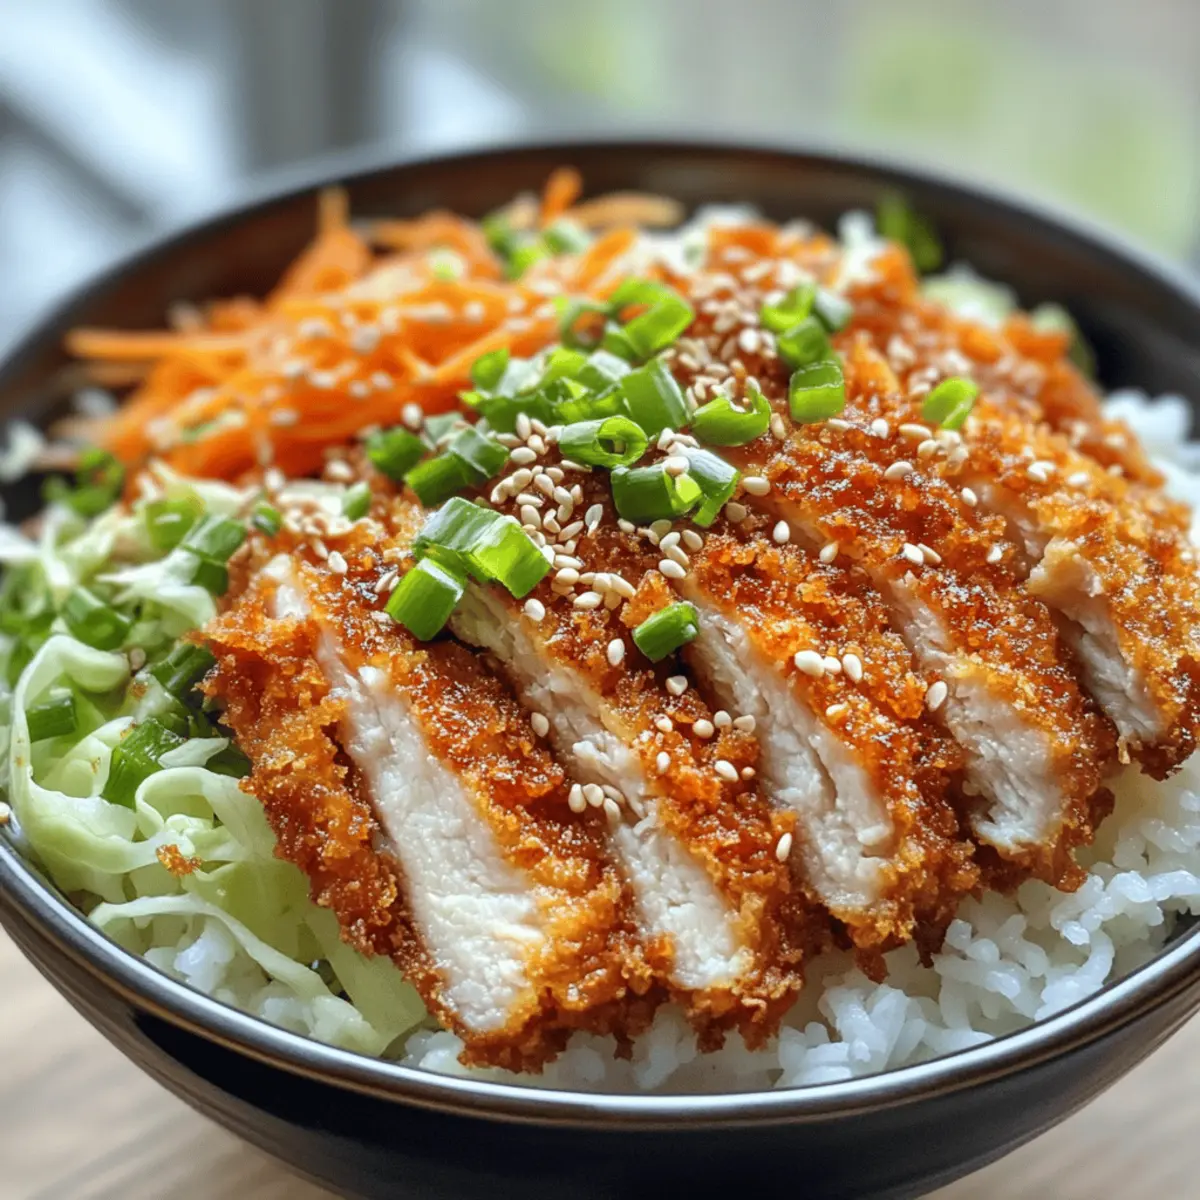
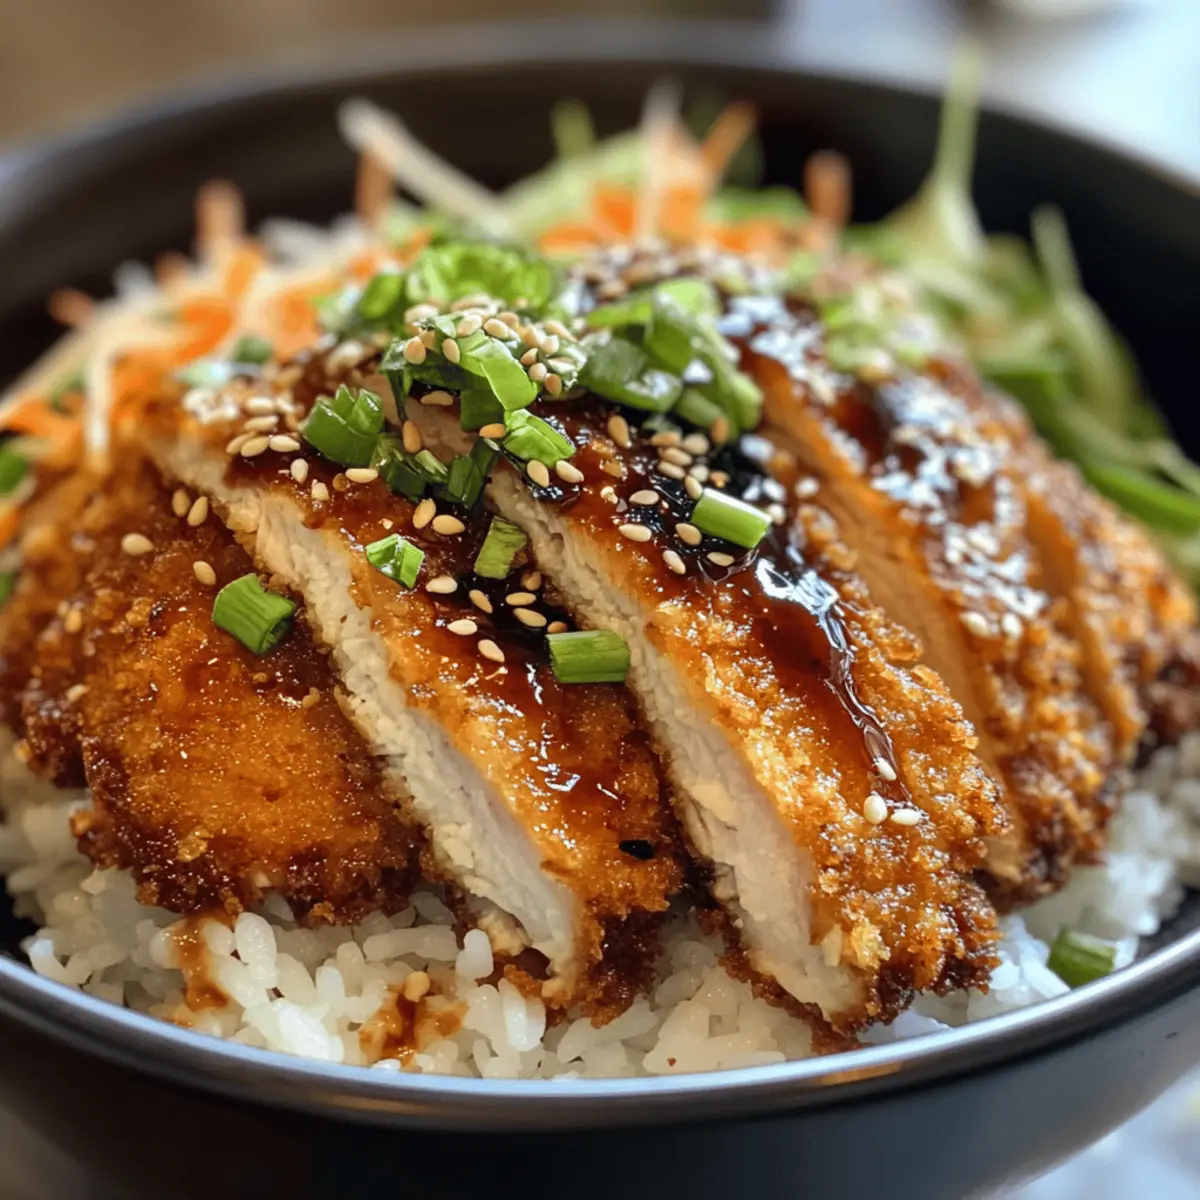
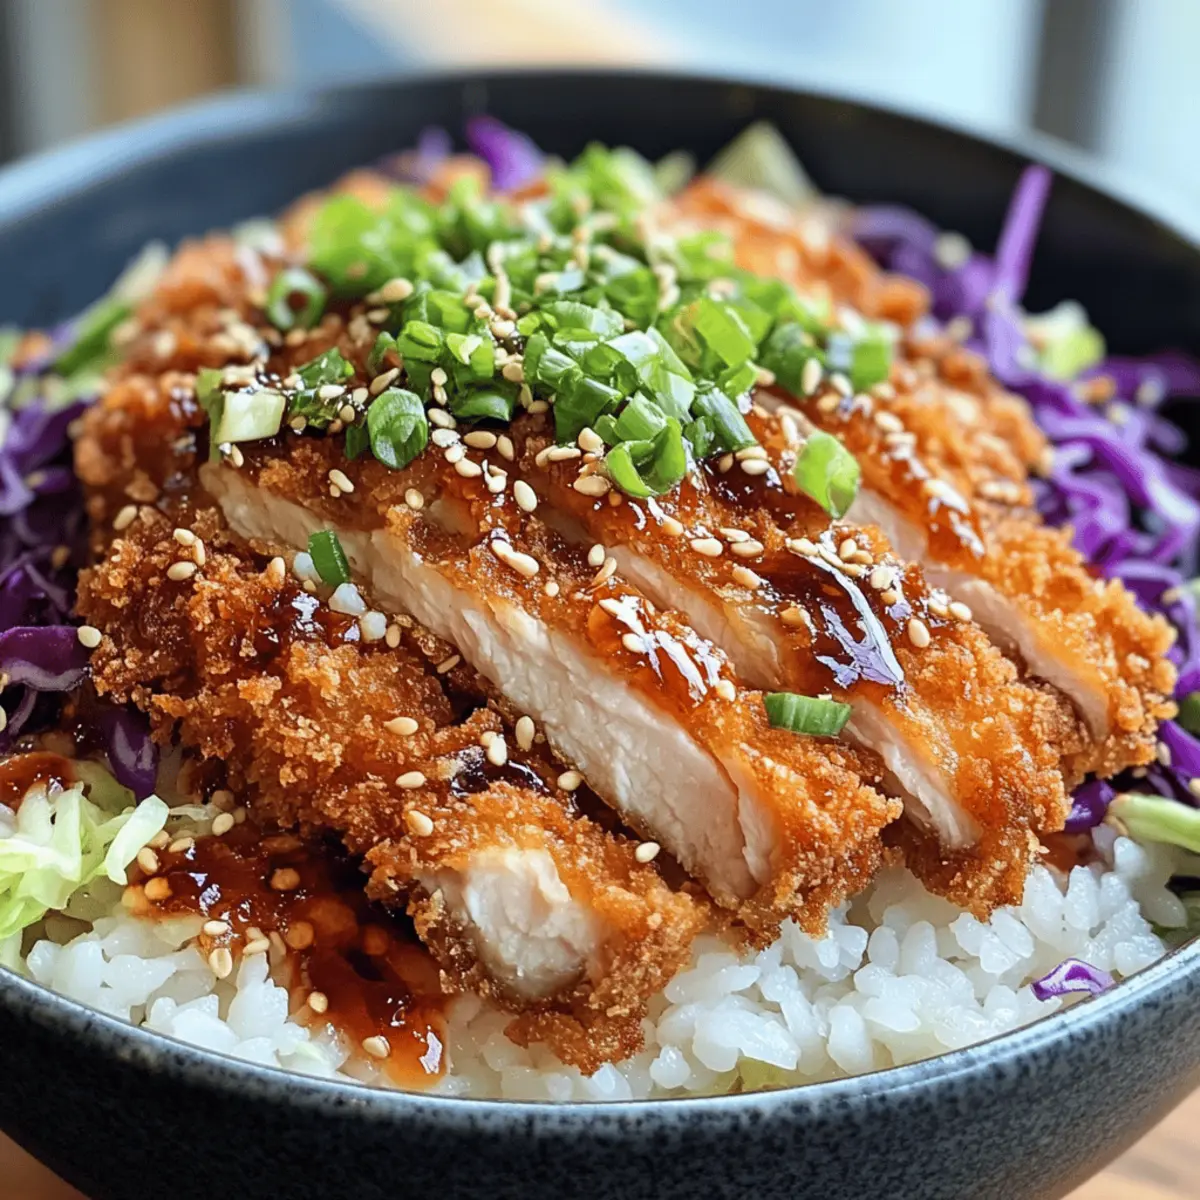
To create your Japanese Katsu Bowls, place a generous serving of the seasoned rice in each bowl as the base. Lay the sliced katsu atop the rice, generously drizzle with the prepared sauce, and then add fresh toppings. Garnish with shredded cabbage, sliced green onions, a sprinkle of sesame seeds, and optional pickled ginger for a burst of color and flavor. Serve immediately for the ultimate dining experience.

Make Ahead Options
These Japanese Katsu Bowls are fantastic for meal prep, making weeknight dinners a breeze! You can bread the chicken or pork up to 24 hours in advance and store it in the refrigerator; this allows the coatings to set, resulting in an even crispier texture when fried. The rice can also be cooked ahead of time and kept in the fridge for up to 3 days; just reheat gently to maintain its fluffiness. For the sauce, prepare it ahead of time and keep it sealed until you’re ready to serve. When it’s time to eat, simply fry the katsu until golden and serve it over the warmed rice with a drizzle of sauce. Each bite will be just as delicious as if freshly made, saving you precious time and stress!
Storage Tips for Japanese Katsu Bowls
Fridge: Store leftover katsu and rice in an airtight container for up to 3 days. Ensure the katsu is completely cooled before sealing to avoid moisture buildup.
Freezer: For longer storage, freeze the cooked katsu separately in a freezer-safe bag for up to 2 months. Wrap it tightly to prevent freezer burn.
Reheating: Reheat the katsu in a hot oven (350°F / 175°C) for about 10-15 minutes to restore its crispiness. Avoid using a microwave, as it may make the katsu soggy.
Rice Storage: Rice can be stored in the fridge for up to 3 days; however, it’s best freshly made for optimal flavor and texture.
What to Serve with Authentic Japanese Katsu Bowls
As you prepare your delightful Katsu Bowls, consider these scrumptious side dishes to elevate your meal experience.
- Crisp Side Salad: A light salad with mixed greens, cucumber, and a tangy dressing refreshes the palate and balances the richness of the katsu.
- Miso Soup: Warm, savory miso soup complements the crispy katsu, providing a comforting Japanese touch to your dinner. The umami flavor harmonizes beautifully.
- Pickled Vegetables: Tangy, crunchy pickled daikon or cucumbers add brightness and a delightful crunch that contrasts well with the rich flavors of katsu. Plus, they bring a pop of color to your plate!
- Steamed Edamame: These tender soybeans offer a simple, yet satisfying side, with a sprinkle of sea salt that enhances each bite. They provide a protein boost and a lovely textural contrast.
- Japanese Potato Salad: Creamy and tangy, this dish adds a unique flavor profile and a comforting creaminess that pairs well with the crispy katsu. It’s a delightful twist that everyone will love.
- Sapporo Beer or Green Tea: For beverages, a refreshing Sapporo beer pairs beautifully with the fried dish, while green tea provides a lighter option that complements your meal’s flavors.
Expert Tips for Japanese Katsu Bowls
-
Perfect Oil Temperature: Ensure the oil is hot enough (around 350°F) before adding the katsu; this prevents soggy batter and guarantees a crispy exterior.
-
Don’t Overcrowd: Fry the katsu in batches if necessary; overcrowding the pan can drop the oil temperature and lead to uneven cooking.
-
Check for Doneness: Use a meat thermometer to confirm that the chicken or pork reaches an internal temperature of 165°F (75°C) for safe consumption.
-
Customizable Breading: Experiment with different breading options, like whole wheat panko or seasoned breadcrumbs, to give your Katsu Bowls a unique twist.
-
Cool the Rice: Allowing the rice to rest after cooking helps achieve the fluffy texture that perfectly complements the katsu’s crunch.
-
Garnish Generously: Don’t skimp on the toppings; adding fresh ingredients like cabbage, green onions, and sesame seeds enhances the visual appeal and flavor of your Japanese Katsu Bowls.
Japanese Katsu Bowls Variations
Feel free to get creative with your Japanese Katsu Bowls; these ideas will elevate your dish and delight your taste buds!
-
Vegetarian Option: Substitute chicken or pork with fried tofu or eggplant for a satisfying plant-based alternative. The crispy texture remains, delivering all the comfort of traditional katsu without meat.
-
Spicy Kick: Add sriracha or a drizzle of spicy mayo to your sauce for an exciting twist! This layer of heat pairs perfectly with the savory katsu and fluffy rice.
-
Crispy Katsu Topping: Crush some extra panko and mix with spices to create a crunchy topping. A sprinkle on the katsu adds delightful texture and visual appeal, making your dish pop.
-
Noodle Bowl: Swap out rice for steamed soba or udon noodles for a fun, slurpy rendition. This variation introduces a different texture and experience, embracing traditional Japanese flavors beautifully.
-
Flavor Boost: Experiment with a mix of spices such as garlic powder, ginger, or even curry powder in your breadcrumb coating. This subtle shift creates exciting new flavor profiles in every bite.
-
Add a Soft-Boiled Egg: Top with a soft-boiled egg for richness and depth. The luscious yolk, when broken, adds creaminess to the dish, balancing the crunch of the katsu.
-
Zesty Sauce: Combine tonkatsu sauce with a splash of citrus juice, like yuzu or lemon. This bright addition enhances the overall flavor while keeping it refreshing and lively.
-
Katsu Sushi Bowls: For a creative spin, serve the katsu as a deconstructed sushi bowl. Layer it with sushi rice, avocado slices, pickled carrots, and drizzle with soy sauce or wasabi for a delightful fusion experience. Explore how this can elevate your family mealtime by checking out our Roll Sushi Bowls for more inspiration!
Japanese Katsu Bowls Recipe FAQs
How do I choose the right meat for katsu?
Absolutely! For the best flavor and texture in your Japanese Katsu Bowls, I recommend choosing boneless, skinless chicken breasts or pork loin. If you’re looking for a vegetarian option, think about using firm tofu or eggplant. Just ensure they’re sliced thinly to get that crispy finish!
How should I store leftover katsu and rice?
For the fridge, store your leftover katsu and rice in an airtight container for up to 3 days. It’s important to let the katsu cool completely before sealing it to prevent any moisture build-up that could lead to sogginess.
Can I freeze my katsu?
Absolutely! To freeze, cool your cooked katsu completely, then wrap each piece tightly in plastic wrap before placing them in a freezer-safe bag or container. This helps prevent freezer burn. It can be stored for up to 2 months. When you’re ready to enjoy, just bake it in a preheated oven at 350°F (175°C) for about 10-15 minutes to restore its crispy texture.
What should I do if my katsu isn’t crispy?
Very! If your katsu ends up soggy, it could be because the oil wasn’t hot enough when frying. Make sure to heat the oil to around 350°F (175°C) for that golden crunch. Additionally, avoid overcrowding the pan; fry in batches if necessary to maintain the oil temperature.
Is this recipe suitable for people with dietary restrictions?
Definitely! You can easily make these Japanese Katsu Bowls allergy-friendly. For a gluten-free option, substitute wheat flour and panko with certified gluten-free varieties. Also, for egg-free versions, consider using flaxseed meal or aquafaba as the binding agent instead of eggs. Just make sure to double-check specific ingredient labels for hidden allergens.
How do I keep leftover rice from becoming hard?
If you store rice properly, it shouldn’t become hard! After cooking, allow it to cool, then store it in an airtight container. Adding a little water to the rice before reheating helps to maintain its moisture content and keeps it fluffy and delicious, even when reheated.
Irresistible Japanese Katsu Bowls for Quick Comfort Foods
Ingredients
Equipment
Method
- Rinse rice under cold water until clear and soak for 30 minutes. Cook with water, boil, simmer for 15 minutes, rest 10 minutes, and fluff with vinegar mixture.
- Pound meat to even thickness, season with salt and pepper. Set up breading station: flour, egg, panko. Dredge meat in flour, then egg, then panko.
- Heat oil in skillet. Fry katsu for 4-5 minutes on each side until golden and cooked through. Slice into strips.
- Whisk together sauce ingredients in a bowl, adjust to taste.
- Assemble bowls with rice, katsu, sauce, and toppings.
Leave a Reply