
As the aromas of honey and buttery crust waft through your kitchen, you might just find yourself swept away by a newfound love for baking. This Salted Honey Pie, with its flaky crust and creamy custard filling, marries sweet and sweet-savory in the most enchanting way. Not only is it a delightful dessert that’s perfect for gatherings, but this recipe is also a fantastic way to impress family and friends with minimal fuss. Whether you’re an experienced baker or a novice in the kitchen, I promise this pie will inspire your inner pastry chef. Are you ready to dive into this scrumptious journey and create a masterpiece that will leave everyone craving more?
Why is Salted Honey Pie Unforgettable?
Heavenly Harmony: The blend of sweet honey and flaky sea salt creates an unforgettable harmony that dances on your palate.
Simplicity: With just a handful of ingredients, this pie is easy to whip up, ensuring you can impress without stress.
Gorgeous Presentation: Its golden crust and smooth filling make it a showstopper at any gathering—perfect for holidays or special occasions.
Versatile Serving: Pair it with a dollop of whipped cream or fresh fruit to elevate your dessert to new heights, much like our delightful Salted Caramel Apple bars.
Crowd-Pleaser: Everyone will be talking about your baking skills when you serve this unique dessert, making every slice a moment to savor!
Salted Honey Pie Ingredients
For the Crust
• All-purpose flour – Structure for pie crust; use gluten-free flour for a GF version.
• Granulated sugar – Sweetness for the crust and filling; can substitute with brown sugar for a caramel flavor.
• Kosher salt – Enhances flavor in both crust and filling; use table salt if on hand.
• Unsalted butter – Fat for tenderness in crust and richness in filling; substitute with coconut oil for a dairy-free option.
• Ice water – Binds the crust ingredients; cold milk can be used as an alternative for a different flavor.
For the Filling
• Honey – Primary flavor and sweetener for filling; maple syrup can be used as a substitute for a different taste.
• Large eggs – Provides structure and moisture in the filling; aquafaba can be used as a vegan substitute.
• Full-fat sour cream (or heavy cream/crème fraîche) – Adds rich creaminess; substitute with nut-based yogurt for a dairy-free option.
• Apple cider vinegar – Balances sweetness and adds tartness; lemon juice can be used instead.
• Flaky sea salt – Finishing touch to enhance flavor; regular salt can be used if unavailable.
Step‑by‑Step Instructions for Salted Honey Pie
Step 1: Prepare the Crust
In a large mixing bowl or stand mixer, combine all-purpose flour, granulated sugar, and kosher salt. Cut in the cold unsalted butter using a pastry cutter or your fingers until the mixture resembles coarse crumbs. Gradually add in ice water, stirring until a dough forms. Shape it into a disk, wrap in plastic, and chill in the refrigerator for at least 1 hour.
Step 2: Roll and Fit Crust
Once chilled, lightly flour your countertop and roll out the dough into a 14-inch round, about 1/8 inch thick. Carefully transfer the rolled dough to a 9-inch pie pan, gently pressing it into the bottom and sides without stretching. Crimp the edges for a decorative finish, then refrigerate the crust again for about 30 minutes to firm it up.
Step 3: Blind Bake
Preheat your oven to 375°F (190°C). Line the chilled crust with parchment paper and fill it with pie weights or dried beans to prevent bubbling. Bake for 25-30 minutes, or until the edges are lightly golden brown. Remove the weights, and parchment, and let the crust cool completely on a wire rack while you prepare the filling.
Step 4: Make Filling
In a mixing bowl, whisk together melted butter, granulated sugar, and flour until smooth. Add kosher salt, vanilla extract, honey, and large eggs one at a time, mixing well between additions. Finally, stir in the full-fat sour cream and a splash of apple cider vinegar until well combined. This mixture will create the luscious filling for your Salted Honey Pie.
Step 5: Fill & Bake
Pour the creamy filling into the pre-baked crust, smoothing it out evenly with a spatula. Bake in the preheated oven at 350°F (175°C) for 45-50 minutes, or until the edges are golden and the center jiggles slightly when moved. Keep an eye on the pie’s edges; if they brown too quickly, shield them with foil.
Step 6: Cool & Serve
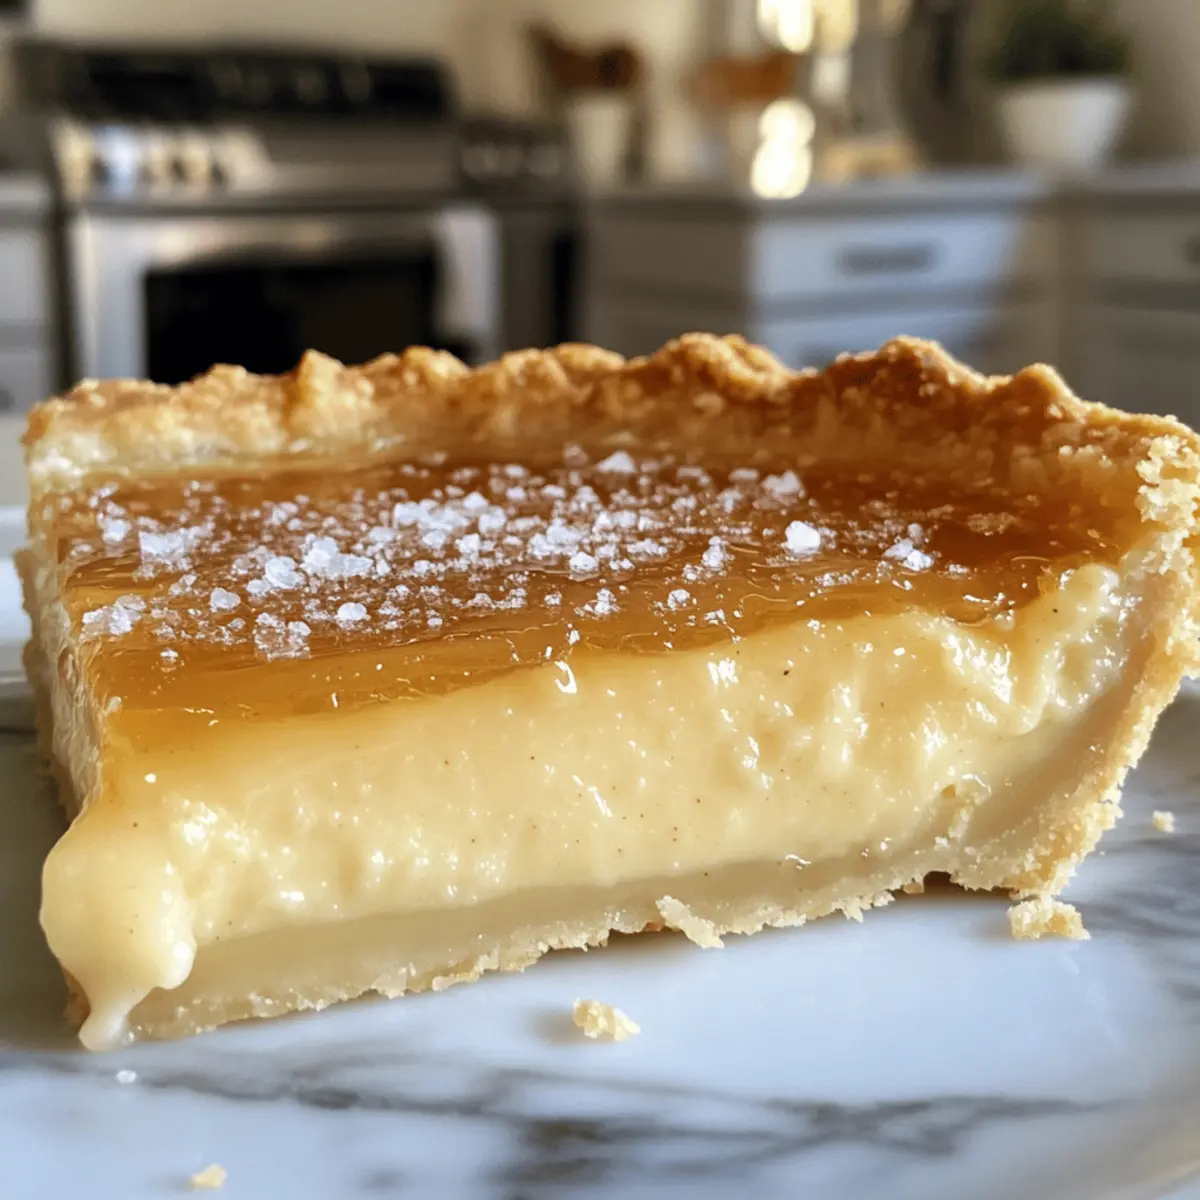
Once baked, remove the pie from the oven and let it cool on a wire rack for at least 2 hours to set. Before serving, sprinkle flaky sea salt generously over the top for a contrasting crunch. Slice the Salted Honey Pie and enjoy each bite of its creamy custard against the flaky crust.

What to Serve with Salted Honey Pie
Picture a sunny afternoon where you enjoy a slice of pie with loved ones, paired with delightful companions that elevate the moment.
- Whipped Cream: A fluffy dollop adds a light, airy contrast that amplifies the creamy filling’s richness.
- Fresh Berries: Raspberries or blueberries introduce a burst of freshness, their tartness balancing the pie’s sweetness. Try arranging them artistically around the plate for a beautiful presentation!
- Vanilla Ice Cream: The cool, creamy scoop brings a lovely temperature contrast, melting slightly into each warm bite of pie.
- Coffee or Espresso: A robust cup of coffee enhances the honey flavors, making for a delightful afternoon treat while indulging in a slice.
- Caramel Sauce: Drizzling warm caramel over the pie not only adds a luxurious edge but also compliments the salted honey notes.
- Spiced Nuts: A small bowl of spiced pecans or almonds introduces a crunchy texture, deepening the flavor experience while adding a nutty depth.
- Grilled Peaches: Lightly caramelized peaches or nectarines served alongside the pie offer a seasonal element that sings of summer’s sweetness.
- Herbal Tea: A cup of chamomile or mint tea cools the palate between bites and adds a calming touch to your dessert experience.
These suggestions help create a memorable gathering with your Salted Honey Pie, making every bite even more special.
Salted Honey Pie Variations & Substitutions
Feel free to get creative with this recipe to suit your taste buds and dietary needs!
-
Maple Sweetener: Swap honey for maple syrup for a subtly different flavor that still brings sweetness and warmth.
-
Nutty Flavor Boost: Add a teaspoon of ground almonds or hazelnuts to the filling for a nutty twist that enhances the richness.
-
Gluten-Free Crust: Use a gluten-free flour blend in place of all-purpose flour to create a stunning pie without gluten.
-
Dairy-Free Delight: Substitute unsalted butter and cream with coconut oil and almond milk yogurt for a creamy, plant-based version.
-
Fruit Infusion: Fold in fresh fruit like diced apples or pears into the filling for a sweet surprise in every slice.
-
Citrus Kick: Add a splash of fresh lemon or orange juice to the filling for a zesty contrast to the sweet honey flavor.
-
Pre-Made Convenience: Choose a store-bought pie crust for a quicker preparation, giving you back time to enjoy with loved ones.
-
Chill Factor: Serve your pie chilled for a refreshing treat, perfect during warm gatherings. A scoop of vanilla ice cream or whipped cream will be the cherry on top, reminiscent of our delightful Salted Caramel Apple bars!
How to Store and Freeze Salted Honey Pie
Room Temperature: Store at room temperature for up to 3-5 days in a covered, airtight container to maintain its delicious creaminess.
Fridge: For longer freshness, refrigerate the Salted Honey Pie, where it can last up to a week while retaining its flavor and texture.
Freezer: To freeze, wrap the pie tightly in plastic wrap and aluminum foil; it can stay frozen for up to 2 months. Thaw in the fridge before serving.
Reheating: Enjoy the pie cold or warm it gently in the oven at 325°F for about 10-15 minutes to refresh its creamy filling and flaky crust.
Make Ahead Options
These Salted Honey Pie preparations are a lifesaver for busy home cooks! You can prepare the pie crust up to 24 hours in advance—just mix, shape, wrap, and refrigerate until you’re ready to use it. The filling can also be made up to 3 days ahead; simply store it in an airtight container in the fridge to keep it fresh and prevent it from forming a skin. When you’re ready to serve, pour the filling into the baked crust and pop it in the oven as per the instructions. This way, you’ll have a gorgeous dessert that’s just as delicious with minimal effort on the day of serving!
Expert Tips for Salted Honey Pie
- Perfect Your Crust: Ensure your butter is super cold; this helps create a flaky texture. Don’t skip chilling the crust before baking for the best results.
- Blind Baking Matters: Always use parchment and weights while blind baking! This vital step prevents bubbling and helps achieve a crisp crust for your Salted Honey Pie.
- Watch the Edges: If your pie edges start to brown too quickly while baking, cover them with foil to prevent burning and keep the pie looking beautiful.
- Custard Consistency: For a perfect filling, mix until just combined. Overmixing can lead to a dense custard instead of a creamy texture.
- Cool Time: Patience is key! Let the pie cool completely before serving so the filling has time to set and slice beautifully.
- Serve Smart: Enhance each slice by pairing it with fresh fruit or whipped cream for an unforgettable dessert experience!

Salted Honey Pie Recipe FAQs
What type of honey should I use for Salted Honey Pie?
Absolutely! I recommend using a floral or mild-flavored honey for the best results, as it allows the sweetness to shine without overpowering the other ingredients. Local honey can elevate the flavor profile even further. However, if you’re looking for a unique twist, maple syrup can be a delightful alternative.
How should I store my Salted Honey Pie?
To maintain freshness, you can store your pie at room temperature for up to 3-5 days in an airtight container. If you’d like it to last longer, refrigerate it where it can stay good for up to a week. Just be sure to cover it to prevent it from drying out!
Can I freeze Salted Honey Pie?
Very much so! To freeze your pie, wrap it tightly in plastic wrap, followed by aluminum foil. This method helps prevent freezer burn, allowing it to last for up to 2 months. When you’re ready to enjoy it, simply thaw it overnight in the refrigerator, and you can serve it cold or gently warm it in the oven at 325°F for about 10-15 minutes to refresh its velvety texture.
What if my pie crust edges are browning too quickly?
No worries! If you notice the edges of your crust are browning too fast during baking, gently cover them with strips of aluminum foil or a pie shield. This will protect the crust while allowing the filling to continue cooking, ensuring you get that beautiful golden finish without burnt edges.
Can I use substitutes for allergies in this Salted Honey Pie recipe?
Of course! If you have dietary concerns, here are some easy swaps: for gluten-free needs, use a gluten-free all-purpose flour blend. For dairy-free options, replace the unsalted butter with coconut oil and the full-fat sour cream with a nut-based yogurt. An egg replacement like aquafaba can work well in place of large eggs, too. Always taste and adjust the sweetness as needed based on your substitutes.
How do I know when my Salted Honey Pie is done baking?
To check for doneness, look for golden edges and a center that jiggles slightly—this indicates the custard is set but still creamy. It’s a delicate balance, but with practice, you’ll get to know the perfect timing (around 45-50 minutes at 350°F). A toothpick inserted should come out clean but still moist!

Salted Honey Pie: Perfectly Sweet with a Flaky Crust
Ingredients
Equipment
Method
- In a large mixing bowl, combine all-purpose flour, granulated sugar, and kosher salt. Cut in the cold unsalted butter until mixture resembles coarse crumbs. Gradually add ice water, stirring until a dough forms. Shape into a disk, wrap in plastic, and chill for at least 1 hour.
- Once chilled, lightly flour your countertop and roll out the dough into a 14-inch round, about 1/8 inch thick. Transfer the rolled dough to a 9-inch pie pan, gently press it in, crimp the edges, and refrigerate again for about 30 minutes.
- Preheat your oven to 375°F. Line the chilled crust with parchment paper and fill it with weights. Bake for 25-30 minutes until edges are golden brown. Remove weights and let cool.
- In a mixing bowl, whisk melted butter, granulated sugar, and flour until smooth. Add kosher salt, vanilla extract, honey, and eggs one at a time, mixing well. Stir in sour cream and apple cider vinegar until combined.
- Pour the filling into the pre-baked crust and bake at 350°F for 45-50 minutes until edges are golden and the center jiggles slightly. Shield edges with foil if needed.
- Once baked, cool on a wire rack for at least 2 hours. Sprinkle flaky sea salt over the top before serving.
Leave a Reply