
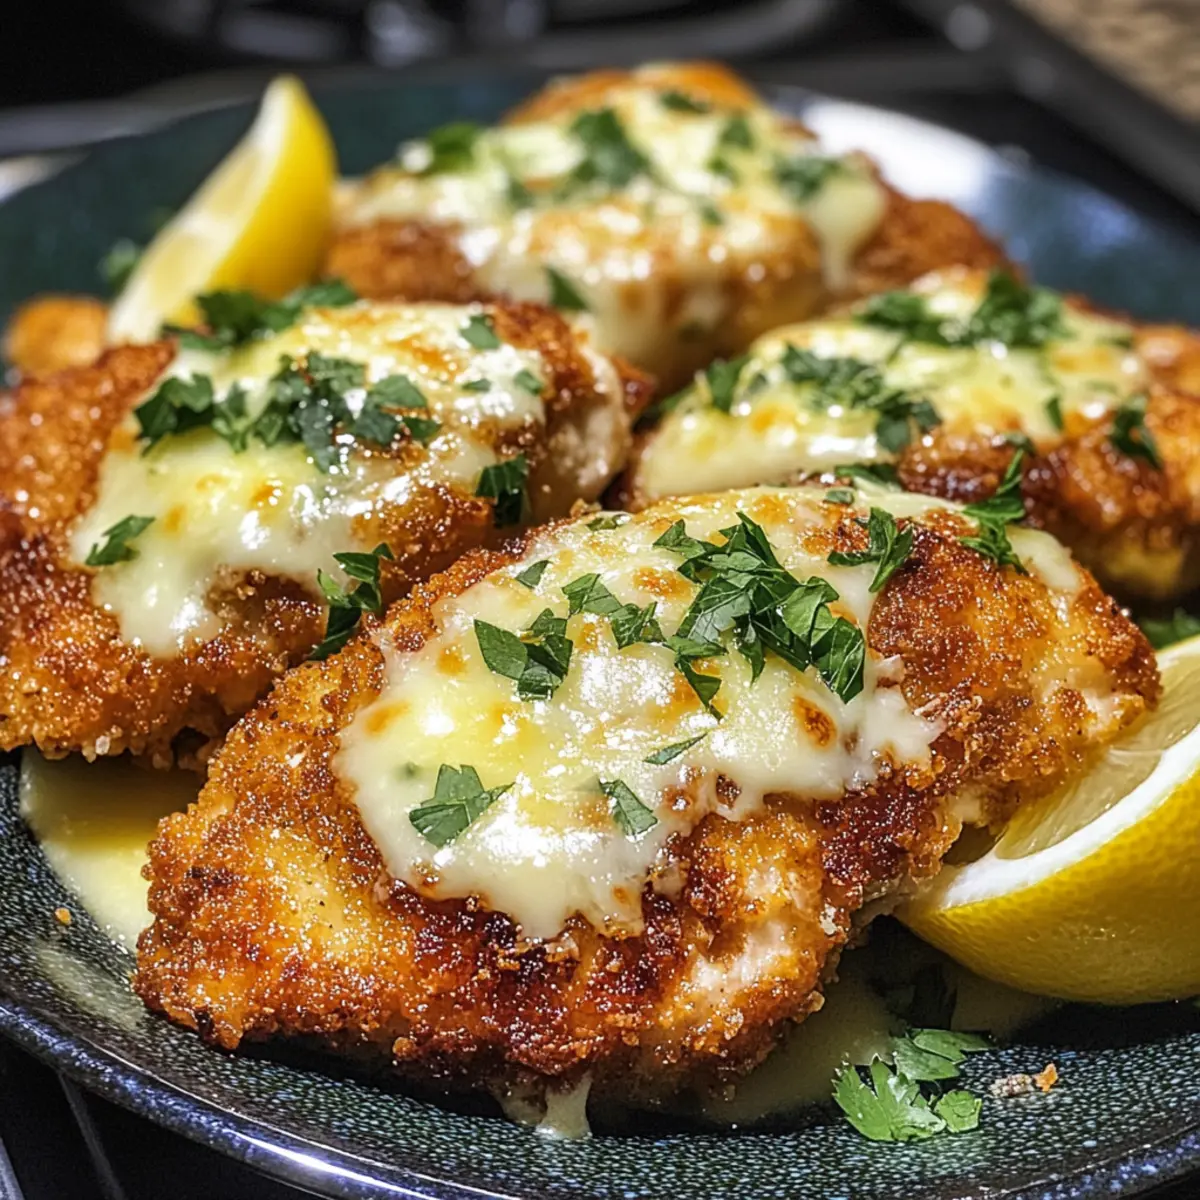
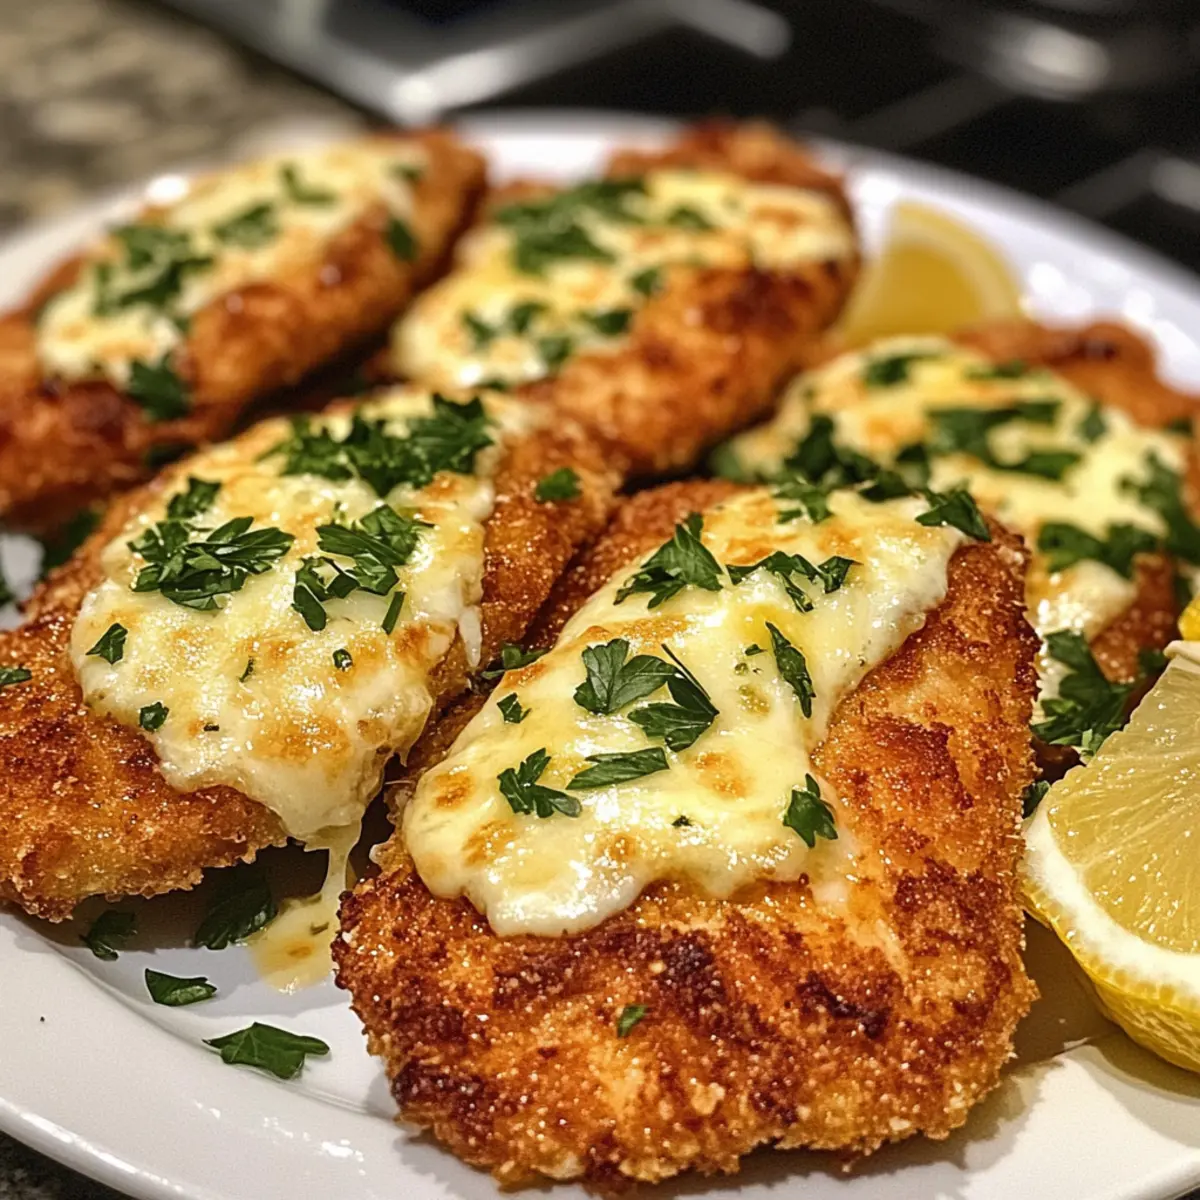
The sizzle of chicken meeting hot oil can instantly whisk you away from the day’s chaos—this is exactly the moment I crave when making my Cheesy Lemon Chicken Romano. It’s not just a dish; it’s a warm embrace on a plate, featuring tender, breaded chicken infused with the tart brightness of lemon. This recipe brings the best of comfort food right into your kitchen, marrying the crispy texture of panko with the savory goodness of melted Romano cheese. Perfect for a cozy dinner or a special gathering, it’s quick to whip up and guaranteed to impress even the pickiest of eaters. Who wouldn’t want a golden-brown, cheesy delight that makes you feel like you’re dining in a quaint Italian bistro? Ready to learn how to create this masterpiece? Let’s dive in!
What makes this dish a must-try?
Comforting, Flavorful Creation: The Cheesy Lemon Chicken Romano offers a beautiful blend of flavors that makes your taste buds dance with joy.
Quick and Easy: You’ll love how straightforward it is to make, perfect for busy weeknights, yet fancy enough for entertaining guests.
Crispy Perfection: Each chicken piece is breaded with panko and Romano cheese, providing a texture that’s hard to resist.
Zesty Brightness: The fresh lemon zest brightens the dish, making every bite feel like a refreshing escape.
Versatility in Sides: Pair it with steamed asparagus, as you would with a classic dish, or serve over pasta for a hearty meal—your choice!
Family-Friendly: Even picky eaters will be coming back for seconds, making it a surefire hit at the dinner table. Don’t forget to check out my take on Dollys Chicken Stuffing for more comfort food inspiration!
Lemon Chicken Romano Ingredients
• Here’s everything you need to create this comforting dish!
For the Chicken
- Boneless, skinless chicken breasts – Provides the main protein; using thicker breasts results in better texture.
- Large egg – Acts as a binding agent for the breading to ensure it sticks beautifully.
- All-purpose flour – Helps the egg adhere; you can replace this with a gluten-free blend if desired.
For the Breading
- Panko bread crumbs – Creates that irresistible light and crispy texture; regular bread crumbs can yield a denser coating, if preferred.
- Finely shredded Romano cheese – Offers a salty, nutty flavor that enhances the chicken; Parmesan can also be used as a substitute.
- Minced fresh oregano – Adds an herbal touch; dried oregano can work if you’re in a pinch.
- Lemon zest – Essential for bringing a fresh, citrus flavor that brightens this Lemon Chicken Romano dish.
- Garlic powder – Elevates the flavor profile; fresh minced garlic can be swapped in for a stronger taste.
- Salt and freshly ground black pepper – Your basic seasonings that tie everything together; adjust to suit your palate.
For Cooking
- Olive oil – Used for frying, adding a rich depth to the dish; feel free to substitute with vegetable oil.
- Lemon wedges – Perfect for spritzing over the finished dish to give that extra zesty brightness.
For Garnish (Optional)
- Minced fresh parsley – Gives a pop of color and freshness; a lovely finishing touch!
Now that you have all the ingredients, get ready to bring comfort food to a whole new level with this delightful Lemon Chicken Romano!
Step‑by‑Step Instructions for Lemon Chicken Romano
Step 1: Prep Chicken
Begin by slicing the boneless, skinless chicken breasts horizontally to create thin cutlets. Gently pound each piece to an even thickness of about 1/2 inch, which helps them cook evenly. Allow the chicken to rest at room temperature for 10 minutes, ensuring they remain tender and juicy throughout the cooking process.
Step 2: Create Breading Mixtures
In one shallow dish, whisk together the large egg and all-purpose flour until smooth, creating a binding mixture. In another dish, combine panko bread crumbs, finely shredded Romano cheese, minced oregano, lemon zest, garlic powder, salt, and pepper. This flavorful breading will coat the chicken and give your Lemon Chicken Romano that crispy texture.
Step 3: Coat Chicken
Dredge each chicken cutlet first in the egg mixture, allowing any excess to drip off. Then, transfer the cutlet to the panko mixture, pressing the crumbs onto the chicken to ensure an even coating. Repeat for all cutlets, making sure each piece is well-covered and ready for frying, which is key to achieving the desired crunch.
Step 4: Pan Fry Chicken
Heat a generous amount of olive oil in a large skillet over medium-high heat. Once the oil shimmers, carefully add two chicken cutlets at a time, frying them for about 2 minutes on each side until golden brown and crispy. Maintain this balance of heat to get that perfect, crunchy exterior while keeping the chicken moist inside.
Step 5: Transfer to Baking Sheet
After browning, transfer the fried cutlets to a rimmed baking sheet lined with parchment paper. This will allow them to crisp up evenly in the oven. Once all cutlets are in place, pile the shredded whole milk mozzarella and provolone cheese generously on top of each piece, making sure the cheese will melt beautifully.
Step 6: Bake
Preheat your oven to 350°F (175°C). Place the cheese-laden cutlets in the oven and bake for approximately 8-10 minutes, or until the melted cheese is bubbly and the internal temperature reaches a safe 165°F, ensuring each bite of your Lemon Chicken Romano is delightful and safe to enjoy.
Step 7: Serve
Once baked, remove the Lemon Chicken Romano from the oven and let them cool for a minute. Garnish with extra minced oregano and parsley for a pop of color. Serve hot with lemon wedges on the side for an added burst of flavor as you dig into this comforting dish.

Make Ahead Options
Preparing your Cheesy Lemon Chicken Romano ahead of time can save you precious minutes on busy weeknights! You can bread the chicken cutlets up to 24 hours in advance; simply follow the breading steps and store them in a single layer on a parchment-lined baking sheet, covered with plastic wrap in the refrigerator to maintain their crispiness. For even better results, you can bake the cutlets ahead of time and refrigerate them for up to 3 days. When you’re ready to serve, just pop them in a preheated oven at 350°F (175°C) for about 10-12 minutes, allowing the cheese to melt and the chicken to warm through—just as delicious as when freshly made!
What to Serve with Cheesy Lemon Chicken Romano
Transform your meal with sides that complement the deliciously crispy and zesty chicken cutlets, making every bite a harmonious experience.
-
Garlic Mashed Potatoes:
Creamy and buttery, these mashed potatoes add a comforting balance to the zesty lemon chicken, ensuring a delightful textural contrast. -
Steamed Broccoli:
Bright green and vibrant, this vegetable offers a fresh crunch while its natural slight bitterness complements the richness of the cheese. -
Herb Couscous:
Light and fluffy, couscous infused with herbs presents a lovely nutty flavor that pairs beautifully with the chicken’s savory elements. -
Caesar Salad:
Crisp romaine lettuce and a tangy dressing enhance the dish’s freshness. The crunch of croutons contrasts the chicken’s crispy coating wonderfully. -
Lemon Orzo Pasta:
Zesty and light, lemony orzo serves as an excellent base, soaking up the flavors from the chicken and adding a delightful twist. -
White Wine:
A chilled glass of Sauvignon Blanc or Chardonnay complements the lemon’s brightness, making it the perfect pairing for this flavorful dish.
Each of these options not only enhances the delicious flavors of your Cheesy Lemon Chicken Romano but also adds a unique texture and appeal to your dining experience!
Expert Tips for Lemon Chicken Romano
• Dry Chicken: Ensure the chicken is thoroughly dried before dredging. This helps the coating adhere better and results in a crispier finish.
• Avoid Overcrowding: Fry the chicken cutlets in batches to prevent overcrowding the pan. This allows for proper crisping rather than steaming, ensuring you get that perfect texture.
• Use a Meat Thermometer: Check the internal temperature of the chicken cutlets with a meat thermometer. They should reach 165°F for safe consumption and optimal juiciness.
• Customize the Cheese: Feel free to mix and match cheeses based on personal preference. While Romano is traditional for Lemon Chicken Romano, using a blend of mozzarella and provolone can add a delightful twist to the flavor profile.
• Add Fresh Herbs: Experimenting with fresh herbs like basil or thyme can elevate the dish further. Incorporate them into the breadcrumb mixture for added complexity in flavor.
How to Store and Freeze Lemon Chicken Romano
Fridge: Store cooked Lemon Chicken Romano in an airtight container for up to 3 days. Ensure it’s cooled to room temperature before sealing to prevent moisture buildup.
Freezer: For longer storage, freeze the cooked chicken in a single layer on a baking sheet before transferring to a freezer-safe bag or container. This keeps leftovers fresh for up to 3 months.
Reheating: The best way to reheat is in the oven at 350°F (175°C) for about 10-15 minutes until heated through, preserving the crispy texture. Avoid microwaving, as it can make the chicken soggy.
Make-Ahead Tip: You can prep the breaded chicken cutlets in advance, store them in the fridge for up to a day, and then fry and bake them when you’re ready to serve.
Lemon Chicken Romano Variations
Let your culinary creativity shine by personalizing this delightful dish to suit your taste preferences and dietary needs!
-
Gluten-Free: Replace all-purpose flour with a gluten-free flour blend, and use gluten-free panko for that crunchy coating you crave.
-
Herb-Infused: Incorporate fresh herbs like basil or thyme into the breadcrumb mixture for an aromatic twist that brightens your chicken. The added freshness elevates the whole dish!
-
Spicy Kick: Add a pinch of red pepper flakes to the breadcrumb mixture for a fun heat level. The subtle spice will surprise and delight!
-
Cheese Swap: For a twist on flavor, try using gouda or cheddar cheese instead of Romano. Each cheese brings its unique character, making it a new experience in every bite.
-
Zesty Marinade: Marinate the chicken in lemon juice, garlic, and your favorite herbs for a few hours prior to cooking. This extra step infuses the dish with wonderful flavors!
-
Vegetable Boost: Add thin slices of zucchini or eggplant alongside the chicken on your baking sheet. They’ll soak up the cheese goodness while adding healthy fiber to your meal.
-
Creamy Sauce: Top the finished dish with a drizzle of lemon cream sauce for a rich, velvety addition. Creaminess works to contrast beautifully with the crispy chicken.
-
Cooked in the Air Fryer: For a healthier twist, try air frying your breaded chicken cutlets! Set your air fryer to 400°F and cook for 10-12 minutes for a delightful crunch without the extra oil.
Whether you want to spice things up, change the cheese, or even introduce some veggies, take a moment to explore my other comforting creations like Slow Cooker Chicken or Cowboy Butter Chicken for more inspiration!

Lemon Chicken Romano Recipe FAQs
How do I choose the perfect chicken breasts?
Absolutely! Look for boneless, skinless chicken breasts that are plump and firm. Thicker pieces (about 1 inch) generally yield juicier results. Avoid those with dark spots or an unpleasant odor.
What’s the best way to store leftovers?
Cooked Lemon Chicken Romano can be stored in an airtight container in the fridge for up to 3 days. Make sure to let it cool to room temperature before sealing to prevent steam buildup which can make the coating soggy.
Can I freeze Lemon Chicken Romano?
Very! To freeze, allow the cooked chicken to cool completely. Then, place each cutlet in a single layer on a baking sheet to freeze for about 1 hour. Afterwards, transfer them to a freezer-safe bag, squeezing out as much air as possible. They can be frozen for up to 3 months.
What if my breading isn’t sticking?
If the breading is not adhering, ensure that the chicken is thoroughly dried before dredging. You can also press the crumbs onto the cutlets more firmly to help the breading stick. Plus, using a binding egg mixture can really help!
Are there any dietary considerations I should be aware of?
Absolutely! If you’re cooking for someone with gluten sensitivities, opt for a gluten-free flour blend and ensure that your breadcrumbs are also gluten-free. For dairy allergies, consider using dairy-free cheese alternatives or omitting the cheese altogether, and the dish will still be delicious!
What’s the best way to reheat leftovers?
To reheat while maintaining crispiness, preheat your oven to 350°F (175°C), place the chicken on a baking sheet (you can cover it with foil to retain moisture initially), and heat for about 10-15 minutes until warmed through. Avoid the microwave to keep that crunchy exterior!
Crispy Lemon Chicken Romano: Your New Comfort Food Favorite
Ingredients
Equipment
Method
- Begin by slicing the boneless, skinless chicken breasts horizontally to create thin cutlets. Gently pound each piece to an even thickness of about 1/2 inch.
- In one shallow dish, whisk together the large egg and all-purpose flour until smooth, creating a binding mixture.
- In another dish, combine panko bread crumbs, finely shredded Romano cheese, minced oregano, lemon zest, garlic powder, salt, and pepper to create the breading mixture.
- Dredge each chicken cutlet first in the egg mixture, allowing excess to drip off, then transfer to the panko mixture, pressing to ensure even coating.
- Heat olive oil in a large skillet over medium-high heat. Fry chicken cutlets two at a time for about 2 minutes on each side until golden brown.
- Transfer fried cutlets to a rimmed baking sheet lined with parchment paper. Top with shredded whole milk mozzarella and provolone cheese.
- Preheat the oven to 350°F (175°C). Bake cutlets for about 8-10 minutes until cheese is bubbly and chicken reaches 165°F.
- Remove from oven and let cool for a minute. Garnish with extra minced oregano and parsley, and serve hot with lemon wedges.
Leave a Reply