
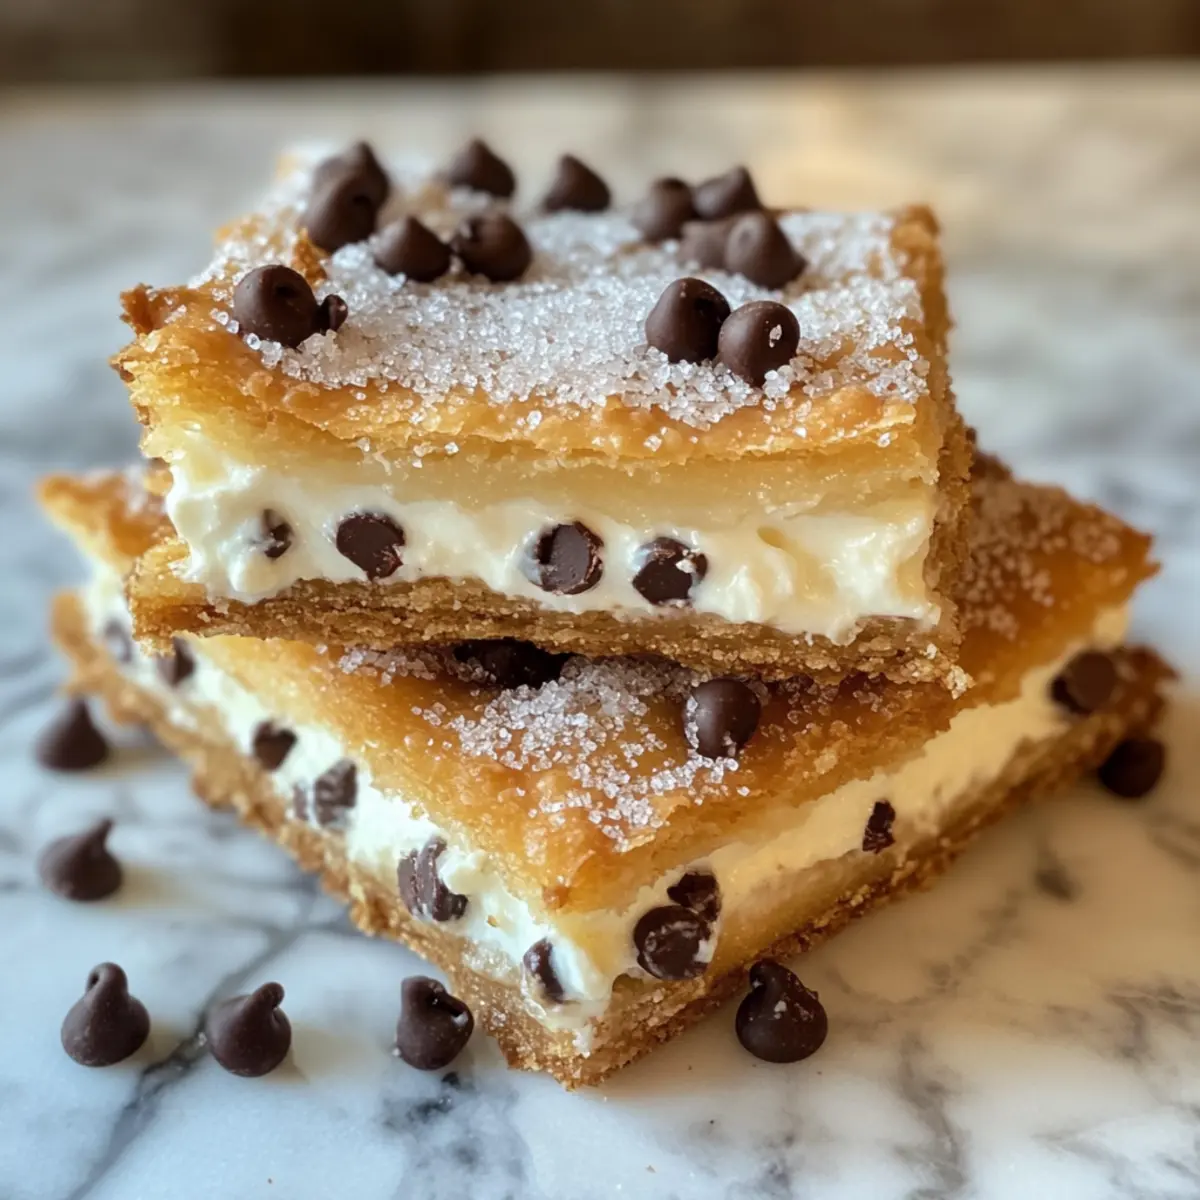
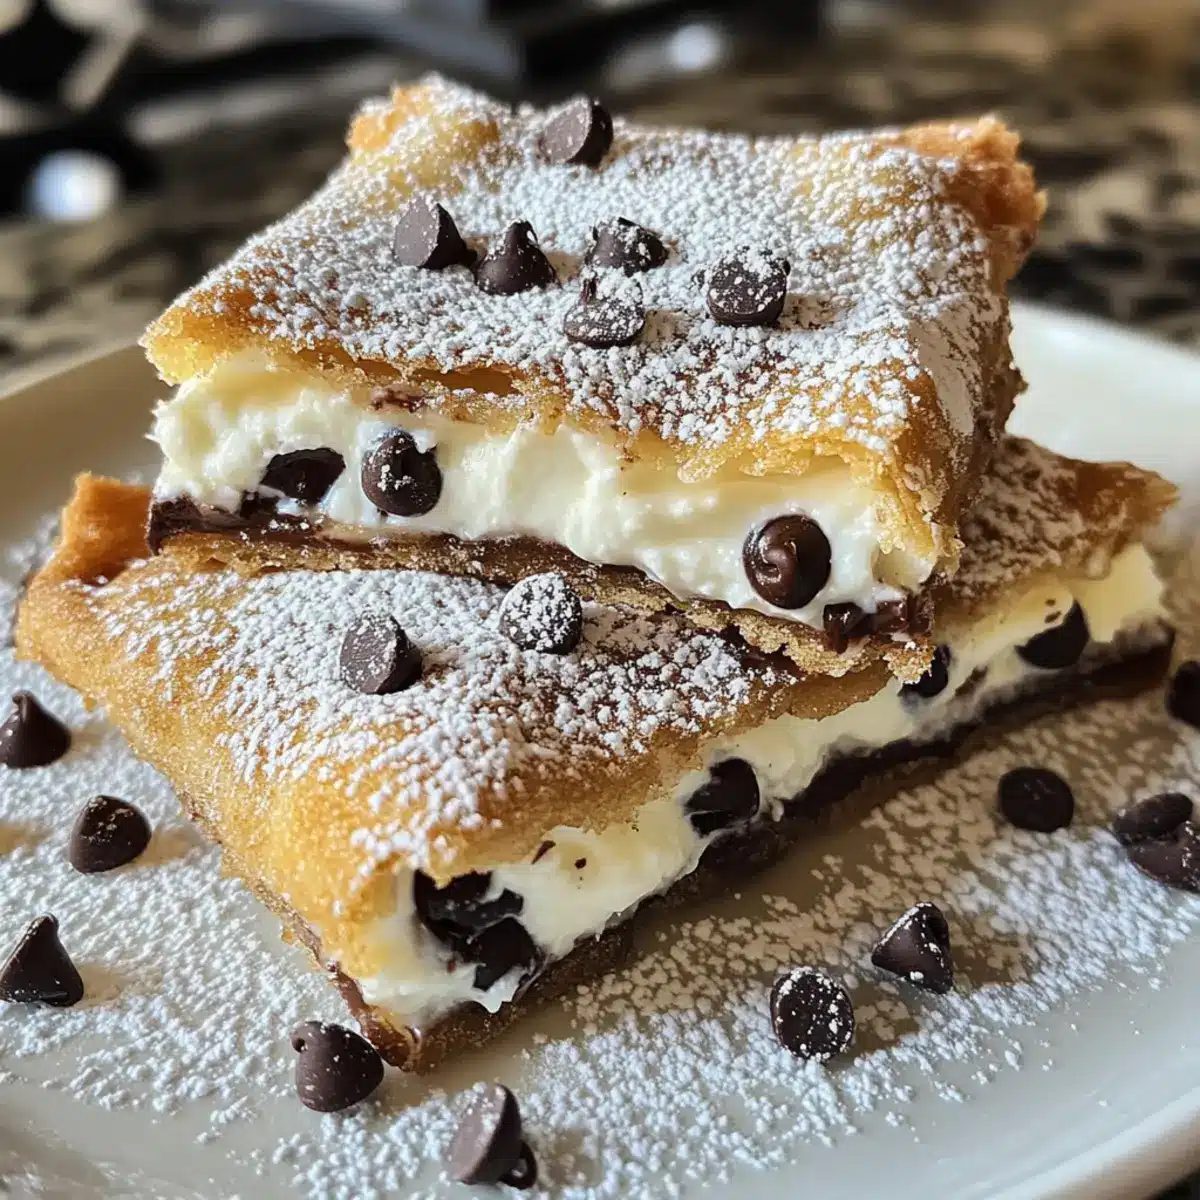
The moment I bit into a crispy cannoli at my favorite Italian bakery, I was transported to a sun-drenched piazza, surrounded by laughter and the enchanting aroma of freshly baked treats. Today, I’m thrilled to share my spin on this classic dessert: Classic Cannoli Squares. This recipe captures the essence of those lovely Italian flavors in a simple, square format that’s both easy to prepare and impressively delicious. Not only do these squares boast a delightful crunchy crust paired with a heavenly, creamy filling, but they also make for a fantastic crowd-pleaser at any gathering. Whether you’re planning a family dinner or simply craving something sweet, you’ll discover how effortless it is to whip up these heavenly squares. Ready to bring a touch of Italy home? Let’s dive in!
Why Are These Cannoli Squares So Irresistible?
Simplicity: This recipe is a breeze to make, combining store-bought pie crusts with a luscious filling, so you can impress your guests without spending hours in the kitchen.
Decadent Flavor: The harmonious blend of creamy ricotta, fragrant vanilla, and rich mini chocolate chips offers an authentic cannoli taste that will have everyone asking for seconds.
Versatile Toppings: Top them with chopped pistachios or maraschino cherries to elevate the presentation, making every serving look like a culinary masterpiece!
Crowd-Pleasing Delight: Perfect for parties or family gatherings, these squares cater to both dessert lovers and those seeking a lighter alternative to traditional greasy fast food.
Time-Saving: With a prep time under 20 minutes, you can enjoy all the deliciousness of cannoli without any fuss. Experience the flavor explosion of these Classic Cannoli Squares that are not only easy to make but also reminiscent of my cherished bakery treats!
Classic Cannoli Squares Ingredients
• Get ready to make these delightful squares!
For the Filling
- Ricotta Cheese – Provides creaminess; whole milk gives richer flavor while low-fat offers a lighter option.
- Powdered Sugar – Adds sweetness; substitute with coconut sugar for a healthier choice.
- Vanilla Extract – Enhances flavor; opt for pure vanilla for the best taste.
- Cinnamon – Adds a warm spice note to the filling.
- Mini Chocolate Chips – Introduces richness and texture; dark chocolate chips are highly recommended.
For the Crust
- Pre-made Pie Crusts – Creates the outer layer; homemade can enhance freshness and flavor.
- Egg (beaten) – Used for the egg wash, giving the crust a shiny finish.
- Sugar (for sprinkling) – Adds sweetness and a delightful texture to the top crust.
Optional Garnishes
- Chopped Pistachios – Enhance presentation with a crunchy element.
- Maraschino Cherries – Add a pop of color and sweetness on top.
- Extra Chocolate Chips – Sprinkle them for an added chocolatey treat!
These Classic Cannoli Squares truly bring that authentic Italian flavor to your dessert table with minimal fuss!
Step‑by‑Step Instructions for Classic Cannoli Squares
Step 1: Prepare the Filling
In a mixing bowl, combine ricotta cheese, powdered sugar, vanilla extract, cinnamon, and mini chocolate chips. Use a handheld mixer to blend until the mixture is smooth and creamy, about 2-3 minutes. For a thicker consistency, strain the ricotta using a fine-mesh sieve to remove excess moisture. Set the filling aside while you preheat your oven.
Step 2: Preheat the Oven
Preheat your oven to 375°F (190°C). This temperature will ensure that your Classic Cannoli Squares bake evenly, achieving a golden-brown crust. While the oven heats up, gather your 9×9-inch baking dish and prepare the pie crusts for the next steps.
Step 3: Roll Out the Pie Crust
Take one pre-made pie crust and gently roll it out on a floured surface, making sure it’s large enough to fit into your baking dish without any cracks. Carefully press the crust into the bottom of the prepared 9×9-inch baking dish. The edges should come slightly up the sides, forming a secure base for your filling.
Step 4: Add the Filling
Spread the creamy ricotta filling evenly over the crust, leaving a small border around the edges. Use a spatula to ensure an even layer, making sure every bite will be filled with that delicious filling. This step is key to achieving the perfect balance of crust and filling in your Classic Cannoli Squares.
Step 5: Prepare the Top Crust
Roll out the second pie crust and carefully place it over the ricotta filling. Seal the edges by crimping them together with your fingers, making sure the filling is fully enclosed. Brush the top crust with beaten egg for a shiny finish, and sprinkle sugar on top for a delightful sweetness that adds a touch of crunch.
Step 6: Bake
Place the prepared dish in the preheated oven and bake for 30-35 minutes. Keep an eye on the edges of the crust; they should turn a beautiful golden brown. This is your sign that the Classic Cannoli Squares are almost ready to satisfy your sweet tooth.
Step 7: Cool and Serve
Once baked, remove the dish from the oven and let it cool for at least 30 minutes on a wire rack before slicing into squares. This cooling period will help the filling set, making each square easy to cut and perfect for serving. Enjoy the delightful flavors of your homemade Classic Cannoli Squares!

What to Serve with Classic Cannoli Squares
Indulge in a delightful culinary experience by pairing these decadent squares with complementary dishes and drinks that enhance their rich flavors.
-
Espresso:
This classic Italian coffee enhances the sweetness of the cannoli squares, creating a perfect after-dinner treat that awakens the senses. -
Fresh Berries:
Juicy strawberries or raspberries not only add a refreshing tartness but also beautiful color, making your dessert plate visually stunning. -
Creamy Gelato:
A scoop of vanilla or pistachio gelato deepens the flavor experience, offering a silky smooth texture that balances the crunchy cannoli squares. -
Pistachio Crumble:
Sprinkle crushed pistachios on top to add a nutty crunch that complements the creamy filling, enhancing both taste and presentation. -
Whipped Cream:
This light, airy topping lets the cannoli squares shine, providing an extra layer of creaminess without overpowering the rich flavors. -
Chocolate Sauce Drizzle:
A drizzle of warm chocolate sauce enhances the indulgence, creating a luscious contrast to the rich, creamy filling within each square. -
Sweet Wine:
Pair with a glass of Moscato or a light dessert wine that harmonizes with the flavors, making your dessert experience feel gourmet and special. -
Maraschino Cherry Topping:
A simple yet charming addition, these cherries bring a burst of flavor and a pop of color that makes each square even more inviting. -
Fruit Salad:
A refreshing mix of seasonal fruits serves as a light contrast to the rich dessert, cleansing the palate and making every bite enjoyable. -
Lemonade Fizz:
A fizzy lemonade cocktail can bring a zesty kick, cutting through the sweetness of the cannoli squares, leaving you feeling refreshed and satisfied.
Expert Tips for Classic Cannoli Squares
-
Draining Ricotta Properly: Use a fine-mesh sieve to drain your ricotta to avoid a watery filling, yielding thicker and creamier Classic Cannoli Squares.
-
Watch the Baking Time: Keep an eye on the edges as they can brown quickly; remove from the oven as soon as they turn golden for best results.
-
Chill Before Cutting: For cleaner slices, refrigerate the squares for about 30 minutes after cooling, helping to firm up the filling.
-
Substitute Wisely: If you prefer a lighter version, consider using low-fat ricotta or even cottage cheese for your filling without losing flavor.
-
Make It Festive: Add a sprinkle of lemon zest to the filling for a refreshing twist that enhances the overall flavor profile of your Classic Cannoli Squares.
How to Store and Freeze Classic Cannoli Squares
Fridge: Store your Classic Cannoli Squares in an airtight container in the refrigerator for up to 3 days. This keeps them fresh and maintains their creamy texture.
Freezer: For longer storage, wrap individual squares in plastic wrap and place them in a freezer-safe container. They can be frozen for up to 2 months without compromising flavor.
Thawing: When ready to enjoy, thaw the frozen squares in the refrigerator overnight. Serve them chilled or let them come to room temperature for the best taste.
Reheating: If desired, reheat in the microwave for a few seconds, but do so carefully to prevent melting the filling. Enjoy your delicious squares!
Make Ahead Options
These Classic Cannoli Squares are perfect for meal prep, allowing you to enjoy a delightful dessert with minimal last-minute fuss! You can prepare the filling (ricotta, powdered sugar, vanilla, cinnamon, and chocolate chips) up to 24 hours in advance; simply store it in an airtight container in the refrigerator to maintain its creamy texture. Moreover, you can roll out the pie crusts and fit them into the baking dish (up to 3 days ahead), covering it with plastic wrap to keep it fresh. When you’re ready to bake, spread the filling onto the crust, top with the second crust, and follow the baking instructions. This makes serving restaurant-quality dessert at home a breeze, perfect for busy weeknights!
Classic Cannoli Squares Variations
Feel free to put your own spin on these delightful squares while enjoying their classic flavors!
-
Mascarpone Substitute: Swap ricotta for mascarpone for an ultra-creamy texture; it’s a indulgent twist that brings rich flavors.
-
Citrus Infusion: Add a teaspoon of lemon zest for a refreshing citrus kick; it brightens the filling and balances sweetness beautifully.
-
Nutty Addition: Fold in chopped toasted hazelnuts or walnuts to introduce a crunchy texture; this nutty surprise complements the creamy filling perfectly.
-
Spiced Up: Incorporate a pinch of nutmeg along with cinnamon for a warm, cozy flavor; it’s a perfect touch for chilly evenings.
-
Bold and Dark: Use dark chocolate chips instead of mini ones for a richer chocolaty taste; it deepens the dessert while keeping it classic.
-
Sweetness Switch: Experiment with maple syrup or agave instead of powdered sugar for a unique, earthy flavor that adds a touch of sweetness.
Whether you want to dress them up with a sprinkle of chopped pistachios or serve with a side of maraschino cherries, these variations ensure everyone enjoys a beautiful dessert! If you’re in the mood for a different sweet treat, consider trying your hand at Cannoli Squares Deliciously or indulge in a slice of Boston Cream Pie. Happy baking!

Classic Cannoli Squares Recipe FAQs
What type of ricotta cheese should I use?
Absolutely! For the best flavor and creaminess, I recommend using whole milk ricotta cheese. However, if you’re looking for a lighter alternative, low-fat ricotta works just fine. Always check for freshness; avoid ricotta with dark spots or an off smell.
How should I store leftovers?
To keep your Classic Cannoli Squares fresh, place them in an airtight container and store them in the refrigerator for up to 3 days. This will help maintain their delightful texture without sogginess.
Can I freeze Classic Cannoli Squares?
Yes, you can easily freeze these decadent squares! Individually wrap each square in plastic wrap, then place them in a freezer-safe container. They can last for up to 2 months in the freezer. When you’re ready to enjoy them, simply thaw in the refrigerator overnight or let them sit at room temperature for a few minutes.
What if my filling is too runny?
If your ricotta filling turns out too watery, don’t fret! You can strain it further using a fine-mesh sieve or cheesecloth. Let it sit for about 30 minutes to remove excess moisture. This will yield a thicker filling that holds together beautifully within your Classic Cannoli Squares.
Are these squares pet-friendly?
No, the Classic Cannoli Squares contain ingredients such as chocolate and sugar that are not suitable for pets. Always keep them out of reach of furry friends, ensuring they stick to their specific diet.
Can I use homemade crust instead of pre-made?
Very much! I often make my own pie crust for a fresher flavor. Just roll out your favorite homemade pastry dough to a similar thickness as the pre-made variety, and follow the same instructions for assembly. Enjoy the added satisfaction of a homemade touch!
Classic Cannoli Squares That Will Wow Your Dessert Table
Ingredients
Equipment
Method
- In a mixing bowl, combine ricotta cheese, powdered sugar, vanilla extract, cinnamon, and mini chocolate chips. Blend until smooth and creamy.
- Preheat your oven to 375°F (190°C).
- Roll out one pie crust and press it into the bottom of a 9x9-inch baking dish.
- Spread the ricotta filling evenly over the crust.
- Cover with the second pie crust and crimp the edges to seal. Brush beaten egg and sprinkle sugar on top.
- Bake for 30-35 minutes until golden brown.
- Let cool for at least 30 minutes before slicing.
Leave a Reply