
The aroma of freshly baked goods is always an invitation to indulge, but when my kitchen fills with the sweet, nutty scent of Baklava Cheesecake, it’s pure magic. This dessert beautifully marries the creamy richness of cheesecake with the flaky, honey-kissed layers of traditional baklava. Perfect for any occasion, whether you’re celebrating a birthday or simply treating yourself after a long day, this fusion dessert promises to delight your senses and impress your guests. You’ll love how quickly this Baklava Cheesecake comes together, and the best part? It’s easily adaptable to be gluten-free or dairy-free, ensuring everyone at the table can enjoy it. Are you ready to make a show-stopping dessert that’s both comforting and tantalizingly unique? Let’s dive in!
Why is Baklava Cheesecake Irresistible?
Decadent Fusion: The marriage of creamy cheesecake with the flaky texture of traditional baklava is a match made in dessert heaven.
Versatile Ingredients: Easily adapt to your dietary needs with options for gluten-free and dairy-free substitutes.
Quick and Easy: This recipe comes together in no time, perfect for those busy days when you crave something special.
Crowd-Pleasing Flavor: Serve this show-stopping dessert at gatherings or potlucks, and watch it disappear in minutes! For other delightful cheesecake options, check out Oreo Cheesecake Cookie and Burnt Basque Cheesecake.
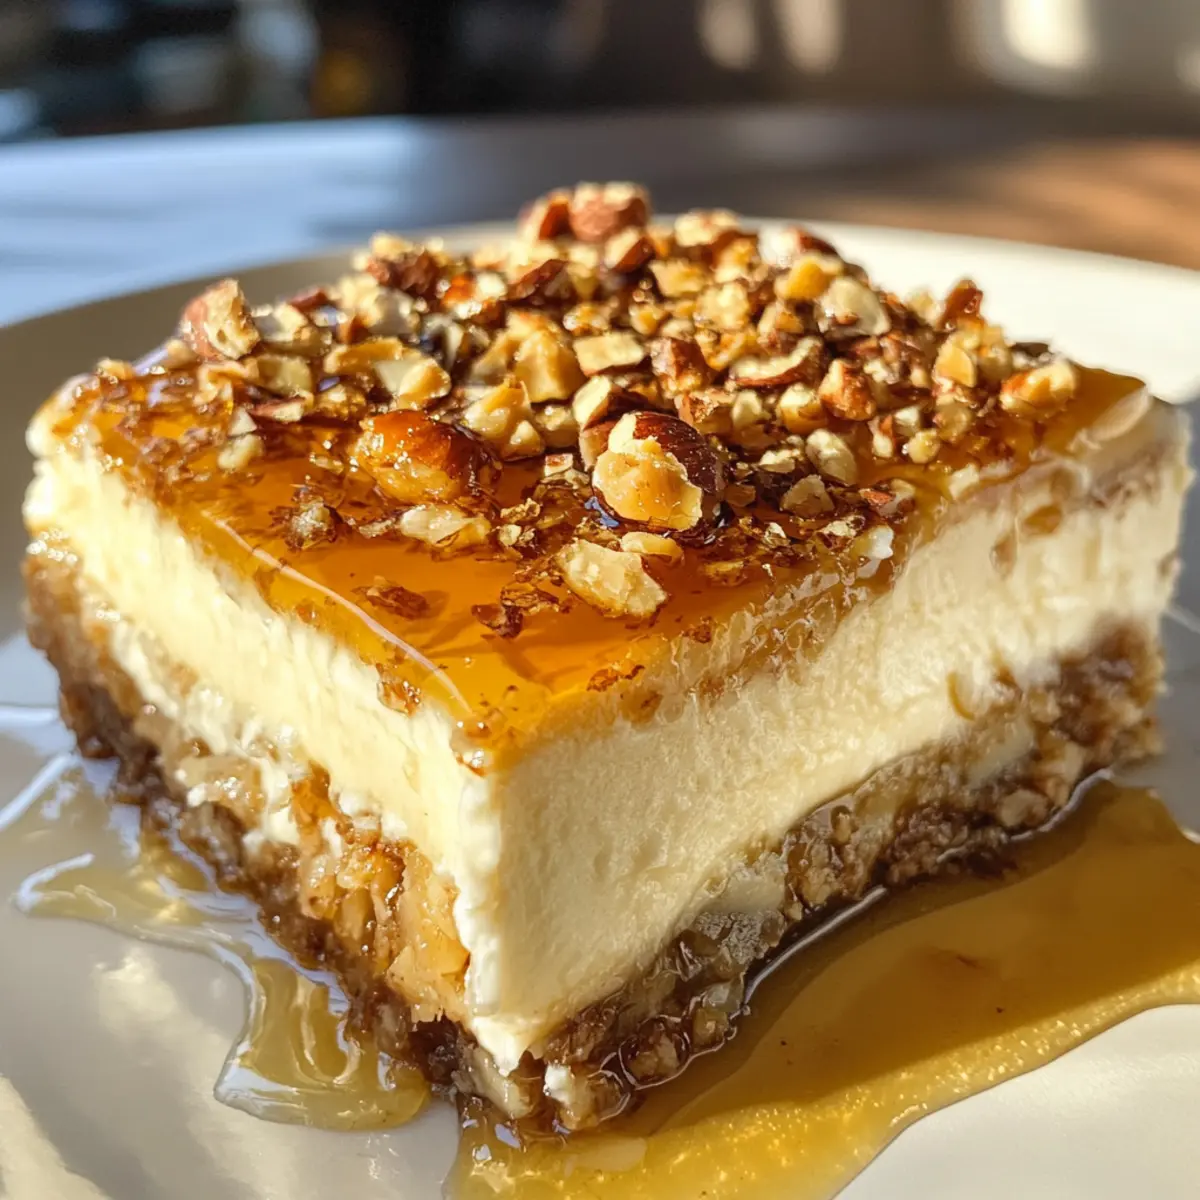
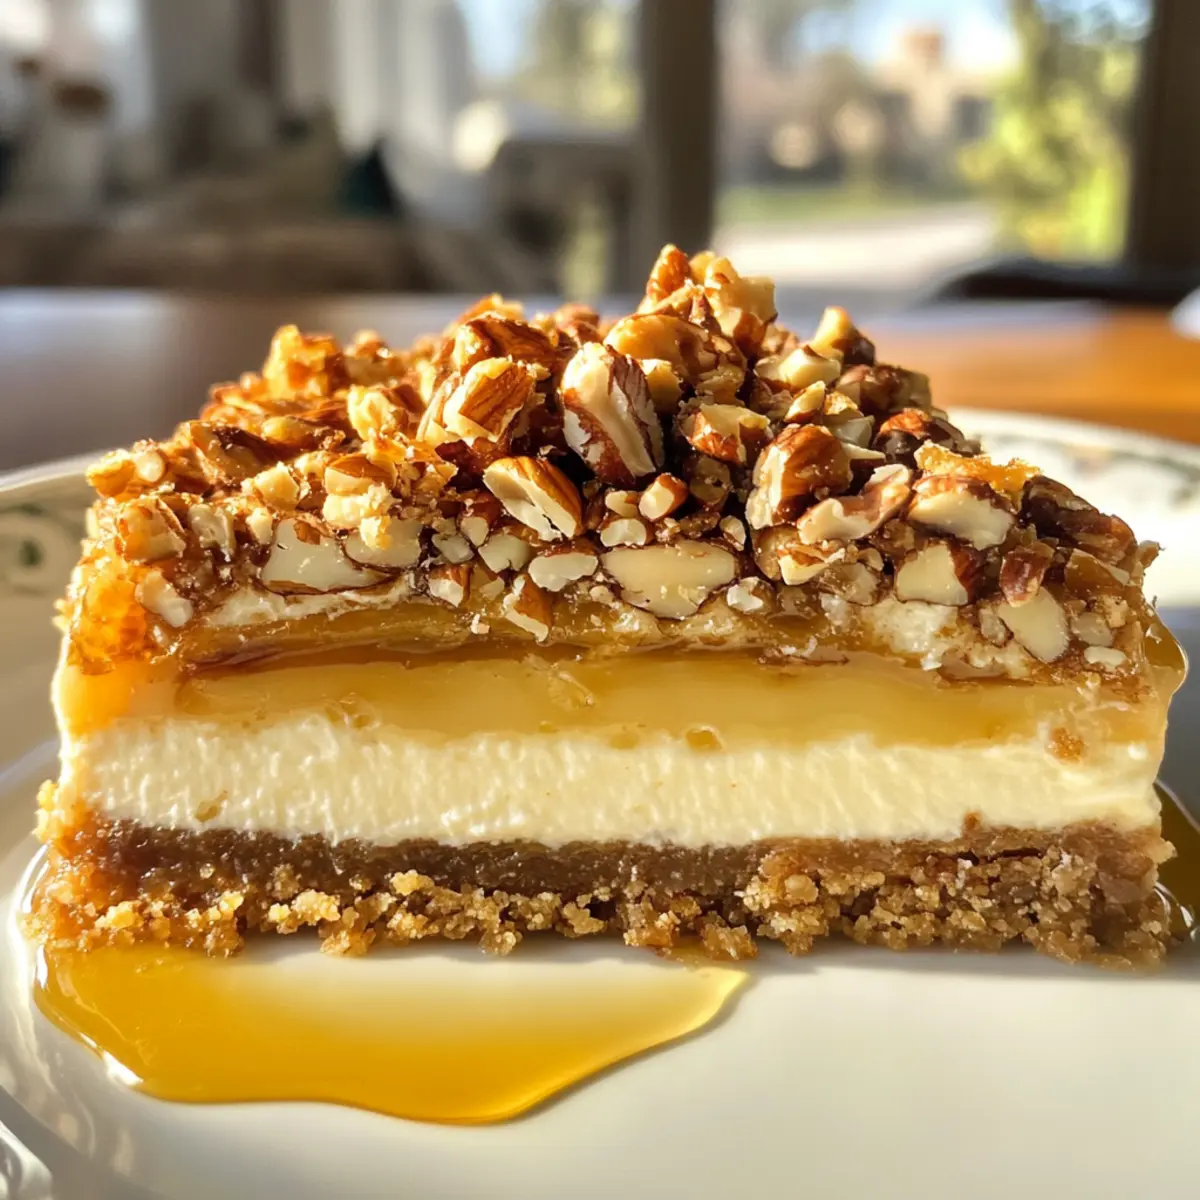
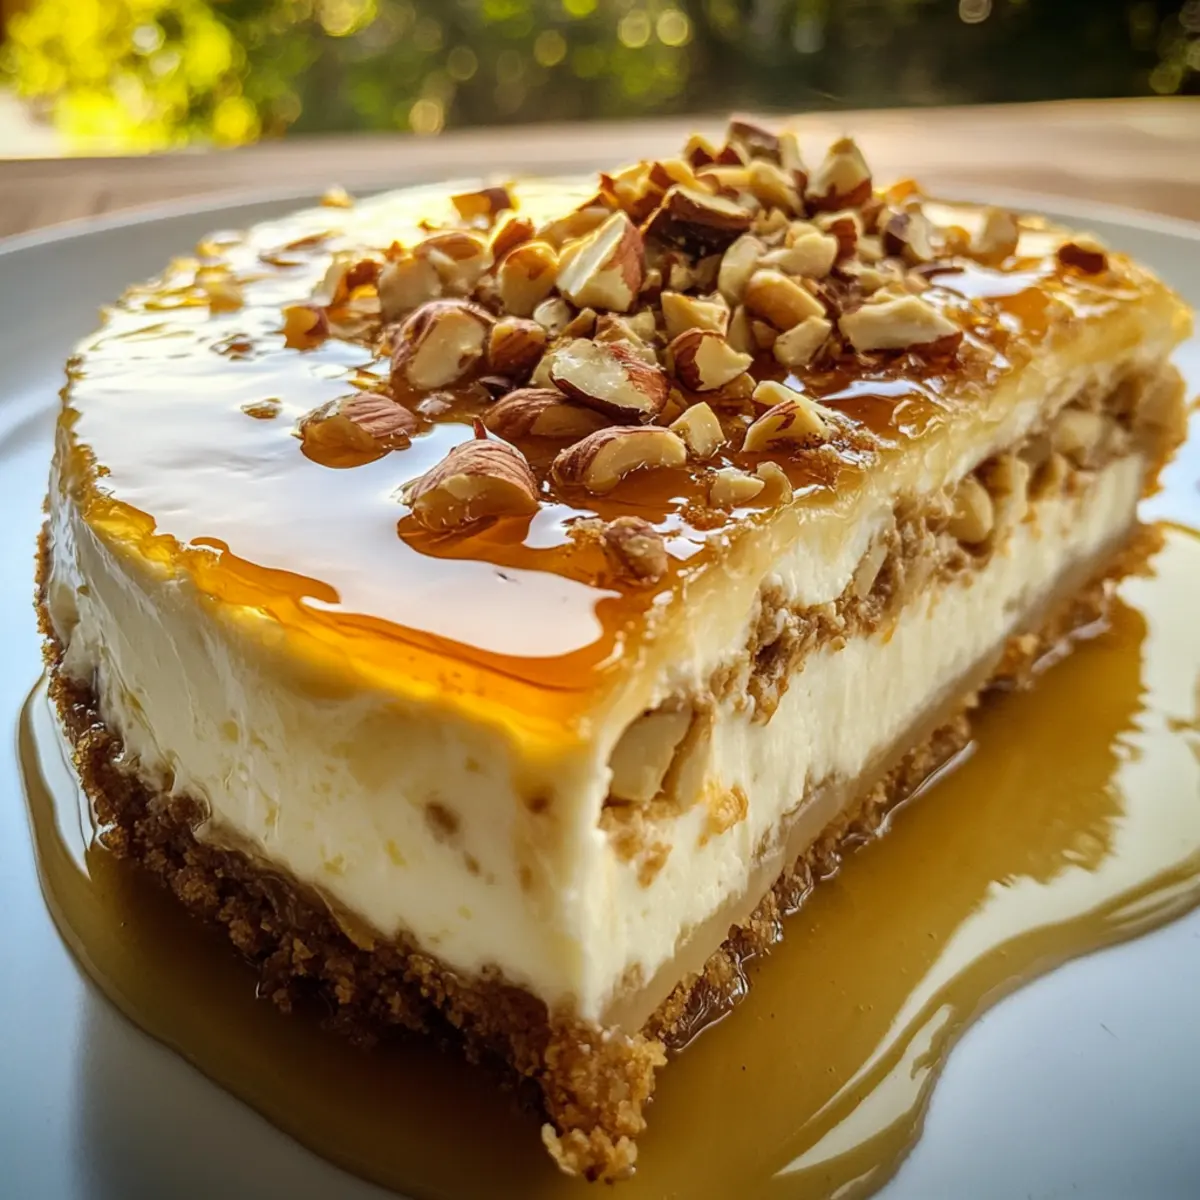
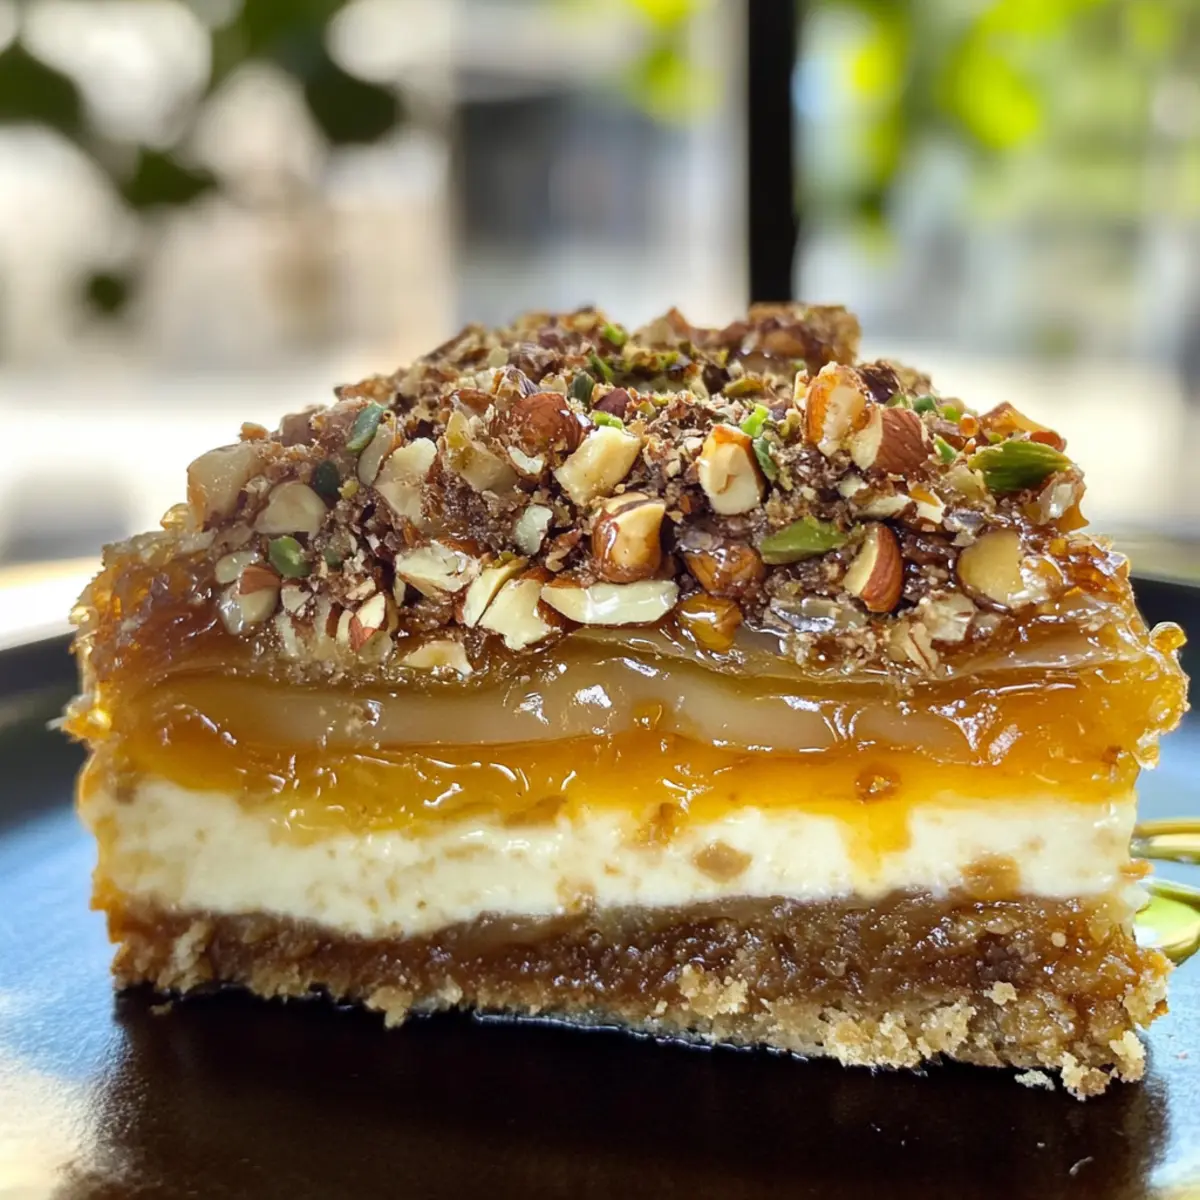
Memorable Presentation: Each slice reveals stunning layers of creamy filling and crunchy nuts, making it as beautiful as it is delicious!
Baklava Cheesecake Ingredients
• Get ready to create a masterpiece!
For the Filling
- Cream Cheese – Provides the creamy base of the cheesecake; substitute with vegan cream cheese for a dairy-free version.
- Sugar – Sweetens the cheesecake filling; coconut sugar can be used for a healthier alternative.
- Eggs – Helps bind and set the filling; flax eggs can be used for a vegan option.
- Sour Cream – Adds creaminess and tang; Greek yogurt can be a suitable substitute for a lighter option.
For the Crust
- Graham Cracker Crumbs – Forms the crust; gluten-free alternatives include gluten-free cookie crumbs or almond flour.
- Melted Butter – Binds the crust together; can be replaced with coconut oil for a dairy-free option.
For the Topping
- Chopped Nuts (walnuts, pistachios) – Adds texture and flavor reminiscent of baklava; substitute with any preferred nuts.
- Honey – Sweetens and enhances flavor; maple syrup can be used for a vegan version.
Step‑by‑Step Instructions for Baklava Cheesecake
Step 1: Prepare Oven and Pan
Preheat your oven to 325°F (160°C), ensuring it’s fully heated for even baking. While the oven warms, grease a 9-inch springform pan with cooking spray or butter. This will help the Baklava Cheesecake release effortlessly after baking, giving you a smooth, beautiful presentation when you serve it.
Step 2: Make the Crust
In a medium bowl, combine graham cracker crumbs and melted butter until well mixed. Press this mixture firmly into the bottom of the prepared springform pan to create an even layer, making sure it’s compact to form a sturdy base. Bake in the preheated oven for about 10 minutes until set, then remove and let it cool slightly.
Step 3: Prepare Filling
In a large mixing bowl, blend softened cream cheese and sugar using an electric mixer on medium speed until smooth and creamy. Add the eggs one at a time, ensuring each is fully incorporated before adding the next. Once combined, gently fold in the sour cream until just mixed, ensuring not to overbeat, as this can create cracks in your Baklava Cheesecake.
Step 4: Incorporate Nuts
Carefully fold in the chopped nuts of your choice—such as walnuts or pistachios—into the cheesecake mixture. This adds a delightful texture and flavor reminiscent of traditional baklava. Once the nuts are evenly distributed, pour this luscious filling over the cooled crust in the springform pan, gently smoothing the top for an even finish.
Step 5: Bake
Place the assembled Baklava Cheesecake in the oven and bake for 50-60 minutes. The edges should be set, but the center should remain slightly jiggly. This indicates it is perfectly baked and will firm up as it cools. Keep an eye on the top to ensure it doesn’t over-brown.
Step 6: Cool
When the baking time is up, turn off the oven and let the Baklava Cheesecake cool inside with the door slightly ajar for about an hour. This slow cooling process helps prevent cracking. Once it’s reached room temperature, transfer it to the fridge to cool completely, which will enhance the flavors and allow it to set properly.
Step 7: Serve and Garnish
Once cooled, remove your Baklava Cheesecake from the springform pan carefully. Drizzle honey over the top for added sweetness and a beautiful shine. Slice into generous pieces and serve at room temperature, perfect for gatherings or cozy nights in. Enjoy the rich blend of flavors and textures!
Tips for the Best Baklava Cheesecake
- Room Temperature Cream Cheese: Ensure your cream cheese is softened to room temperature for a smoother, creamier filling, preventing lumps in your Baklava Cheesecake.
- Don’t Overmix: After adding the eggs, mix just until combined. Overmixing incorporates air, leading to cracks in the finished cheesecake.
- Slow Cooling: Allow the cheesecake to cool in the oven with the door slightly ajar to prevent sudden temperature changes that can cause cracking.
- Chill Before Serving: Let the Baklava Cheesecake chill completely in the fridge for optimal flavor and texture – patience pays off!
- Layer Presentation: For a stunning presentation, slice carefully to showcase the layers of creamy filling and crunchy nuts without disturbing the beautiful top.
How to Store and Freeze Baklava Cheesecake
- Fridge: Store leftover Baklava Cheesecake in an airtight container for up to 5 days. Make sure to let it sit at room temperature for about 30 minutes before serving to restore its creamy texture.
- Freezer: To freeze, wrap the cheesecake tightly in plastic wrap and then foil; it can last up to 3 months. Thaw in the fridge overnight before serving.
- Reheating: If desired, you can gently warm individual slices in the microwave for about 10-15 seconds to enhance the flavors, but be cautious not to overheat.
- Airtight Storage: For the best results, always use airtight containers or wraps to prevent freezer burn and maintain the cheesecake’s delightful flavor and texture.
Baklava Cheesecake Variations & Substitutions
Feel free to explore different twists on this delightful Baklava Cheesecake! Each variation adds a personal touch, making it uniquely yours.
- Gluten-Free Crust: Replace graham cracker crumbs with crushed gluten-free cookies or almond flour to ensure everyone can indulge.
- Dairy-Free Delight: Use vegan cream cheese and coconut oil in the crust for a fabulous dairy-free version that doesn’t skimp on flavor.
- Nut Variety: Experiment with different nuts, like almonds or hazelnuts, for a fresh take on the traditional baklava crunch.
- Sweet Spice: Add a dash of cinnamon or a hint of nutmeg to the filling for an aromatic layer of warmth that enhances its flavor.
- Chocolate Layer: Pour a layer of rich chocolate ganache over the cheesecake before chilling for a luxurious chocolate baklava fusion.
- Fruit Infusion: Top with slices of fresh figs or pomegranate seeds for a pop of color and a burst of freshness on every slice.
- Lemon Zest: Incorporate lemon zest into the filling for a refreshing twist that balances the richness of the cheesecake beautifully.
- Honey Drizzle Substitute: Swap honey for agave syrup or maple syrup for a vegan-friendly alternative that’s just as delicious.
For more cheesecake inspiration, consider trying the Marshmallow Whip Cheesecake or the delightful Hot Fudge Cheesecake! Each option offers a unique flavor experience for your baking adventures.
Make Ahead Options
These Baklava Cheesecake are perfect for those busy weeknights! You can prepare the crust up to 24 hours in advance by pressing the graham cracker mixture into the springform pan and then cover it tightly to prevent drying out. The filling can also be mixed and refrigerated for up to 3 days, just remember to cover it well so that it stays creamy and delicious. When you are ready to bake, simply pour the chilled filling over the prepared crust and bake as directed. This meal prep approach not only saves you time but also allows the flavors to meld beautifully, ensuring your Baklava Cheesecake is just as delightful when served fresh!
What to Serve with Baklava Cheesecake
Indulging in a slice of Baklava Cheesecake offers a symphony of flavors that deserves the perfect pairing to enhance your dessert experience.
- Fresh Berries: The tartness of strawberries or raspberries balances the sweetness of the cheesecake, offering a refreshing contrast.
- Mint Tea: A warm cup of mint tea cleanses the palate and complements the flavors of the Baklava Cheesecake beautifully.
- Greek Yogurt: A dollop of tangy Greek yogurt adds a creamy layer that enhances the dish while ensuring a light finish.
- Chocolate Drizzle: Rich melted chocolate drizzled over the top adds a decadent touch, satisfying chocolate lovers and providing a contrasting flavor.
- Vanilla Ice Cream: The creamy, cold scoop of vanilla ice cream juxtaposes the warm, textured layers of the dessert, creating an inviting experience.
- Honey-Infused Whipped Cream: Light and airy whipped cream with a hint of honey echoes the flavors of your Baklava Cheesecake, making each bite melt in your mouth.
- Pistachio Crumble: A sprinkle of chopped pistachios on top adds an extra crunch, enhancing both presentation and taste, keeping it in theme with the cheesecake.
- Cardamom Coffee: A cup of spiced coffee elevates the whole experience, adding warmth and an aromatic touch that engages the senses as you savor your dessert.
Baklava Cheesecake Recipe FAQs
How do I select the right type of cream cheese for my Baklava Cheesecake?
Absolutely! For the best texture and flavor, choose a full-fat cream cheese that has been softened at room temperature. This will ensure your filling is creamy and smooth. If you’re looking for a dairy-free alternative, vegan cream cheese is a great substitution that still delivers a rich taste.
How long can I store leftovers of Baklava Cheesecake, and how should I do it?
Very! Keep any leftover Baklava Cheesecake in an airtight container in the fridge for up to 5 days. Allow it to sit at room temperature for about 30 minutes before serving to restore its creamy texture. This simple step helps revive the flavors!
Can I freeze Baklava Cheesecake, and what is the best method?
Absolutely! To freeze your Baklava Cheesecake, wrap it tightly in plastic wrap followed by aluminum foil to prevent freezer burn. It can be stored in the freezer for up to 3 months. When you’re ready to enjoy, thaw it in the fridge overnight for the best texture and flavor.
What should I do if my Baklava Cheesecake cracks while baking?
Don’t worry, it happens! To minimize cracking, ensure you mix the batter just until combined, especially after adding the eggs, and avoid overmixing. Also, allow the cheesecake to cool slowly in the oven with the door ajar for about an hour before transferring it to the fridge to set completely. This gradual cooling helps prevent cracks from forming.
Are there any dietary considerations I should be aware of with this recipe?
Very much so! If you have dietary restrictions, you can easily adapt this Baklava Cheesecake. Use gluten-free graham cracker crumbs or almond flour for a gluten-free crust, and opt for coconut oil or dairy-free butter instead of traditional butter. For the filling, dairy-free cream cheese and flax eggs can replace standard ingredients for a vegan option.
Can I use different nuts in my Baklava Cheesecake?
Absolutely! Feel free to mix it up by using any nuts you prefer, like almonds or pecans. Each nut brings its unique flavor and texture to the cheesecake, allowing you to personalize your Baklava Cheesecake and make it truly your own.
Baklava Cheesecake That Will Make You Swoon with Delight
Ingredients
Equipment
Method
- Preheat your oven to 325°F (160°C) and grease a 9-inch springform pan.
- Combine graham cracker crumbs and melted butter, press firmly into the bottom of the pan, and bake for about 10 minutes.
- Blend softened cream cheese and sugar until smooth, add eggs one at a time, then fold in sour cream.
- Fold in the chopped nuts and pour the filling over the cooled crust.
- Bake for 50-60 minutes until edges are set but the center is slightly jiggly.
- Cool in the oven with the door ajar for an hour, then refrigerate until completely cool.
- Remove from the pan, drizzle honey on top, slice, and serve.
Leave a Reply