
Have you ever stumbled upon a dessert that instantly transforms your mood? These Easter Brownies are just that—fudgy, rich, and draped in festive decorations that promise to bring a smile to anyone’s face. With each bite of this Easter Brownies recipe, you’ll not only satisfy your chocolate cravings but also impress your loved ones with their whimsical visual appeal. What’s more, these brownies are quick to whip up and can double as a delightful centerpiece for your spring gatherings. Their rich flavors and inviting decorations make them perfect for celebrations, hinting at the joy of the Easter spirit in every piece. Are you ready to dive into this heavenly chocolate experience that’s both a treat for the taste buds and a playful nod to the season?
Why make Easter brownies this year?
Deliciously Fudgy: These brownies boast a rich, dense texture that melts in your mouth, delivering a satisfying chocolate experience.
Festive Decor: Brighten up your gatherings with playful spring-themed decorations that add charm and whimsy to your dessert table.
Quick Preparation: With simple ingredients and straightforward steps, you’ll have these delightful treats ready in no time—perfect for busy schedules.
Versatile Toppings: Personalize your brownies by experimenting with different toppings or adding a hint of coffee. You can even try making a batch of Kit Kat Brownies for more variety!
Perfect for Sharing: These brownies are a crowd-pleaser, ideal for Easter celebrations, birthday parties, or any festive occasion. Everyone will be asking for your recipe!
Make-Ahead Friendly: Prepare a batch in advance and either freeze them for later or serve fresh for effortless entertaining. Enjoy the sweet taste of spring with every bite!
Easter Brownies Recipe Ingredients
For the Brownies
• Butter – Provides richness and moisture; melt for easy mixing.
• Granulated Sugar – Contributes a crisp top layer for delightful texture.
• Brown Sugar – Adds moisture and creates a wonderfully chewy center.
• Eggs – Binds the ingredients together and enhances the fudgy experience.
• Vanilla Extract – Infuses a warm, inviting flavor and aroma.
• All-Purpose Flour – Offers essential structure to the brownies.
• Cocoa Powder – Delivers a deep chocolate flavor to balance sweetness.
• Salt – Enhances the overall flavor profile, making each bite more satisfying.
• Chocolate Chips – Creates pockets of melted chocolate throughout for extra indulgence.
For the Topping
• Coconut Oil – Used for melting chocolate, achieving a glossy, inviting finish.
• Gel Food Coloring – Allows for vibrant pastel decorations, maintaining white chocolate consistency.
With this Easter Brownies recipe, you’ll have the key ingredients to bring joy and cheer into your kitchen while celebrating the season with delectable treats!
Step‑by‑Step Instructions for Easter Brownies Recipe
Step 1: Melt Butter
Start by melting 1 cup of butter in a medium saucepan over low heat. Keep stirring until it becomes completely liquid and starts to bubble slightly, which should take about 2-3 minutes. Remove from heat and mix in 1 cup of granulated sugar and 1 cup of brown sugar, stirring until the sugars dissolve and the mixture is smooth and glossy.
Step 2: Add Eggs & Vanilla
Once the sugar and butter mixture is cohesive, allow it to cool slightly before adding 4 large eggs, one at a time, mixing thoroughly after each addition. Then, pour in 1 teaspoon of vanilla extract, blending it until fully incorporated. The mixture should have a silky texture that signals it’s ready for the next step.
Step 3: Sift Dry Ingredients
In a separate bowl, sift together 1 cup of all-purpose flour, ½ cup of cocoa powder, and ½ teaspoon of salt. Gradually fold this dry mixture into the wet mixture using a spatula. Stir gently to avoid lumps, just until no flour streaks remain. The batter will be thick and rich, indicative of your perfectly fudgy Easter brownies.
Step 4: Mix in Chocolate Chips
Add 1 cup of chocolate chips to the brownie batter, gently folding them in until they are evenly distributed. This step is crucial as the chocolate chips will melt during baking, creating delightful pockets of gooey chocolate. The mixture should look luscious and indulgent, calling out for the oven.
Step 5: Bake
Pour the brownie batter into a lined 9×13 inch baking pan, spreading it evenly with a spatula. Bake in a preheated oven at 350°F (175°C) for 30-35 minutes. To check for doneness, insert a toothpick in the center; it should come out with a few moist crumbs, indicating the perfect fudgy texture for your Easter brownies.
Step 6: Cool & Top
After baking, let the brownies cool in the pan for about 20 minutes. This cooling period is essential before you add the topping. As they cool, prepare a glossy layer by melting 1 cup of chocolate with 2 tablespoons of coconut oil in a microwave or double boiler until smooth and shiny.
Step 7: Decorate
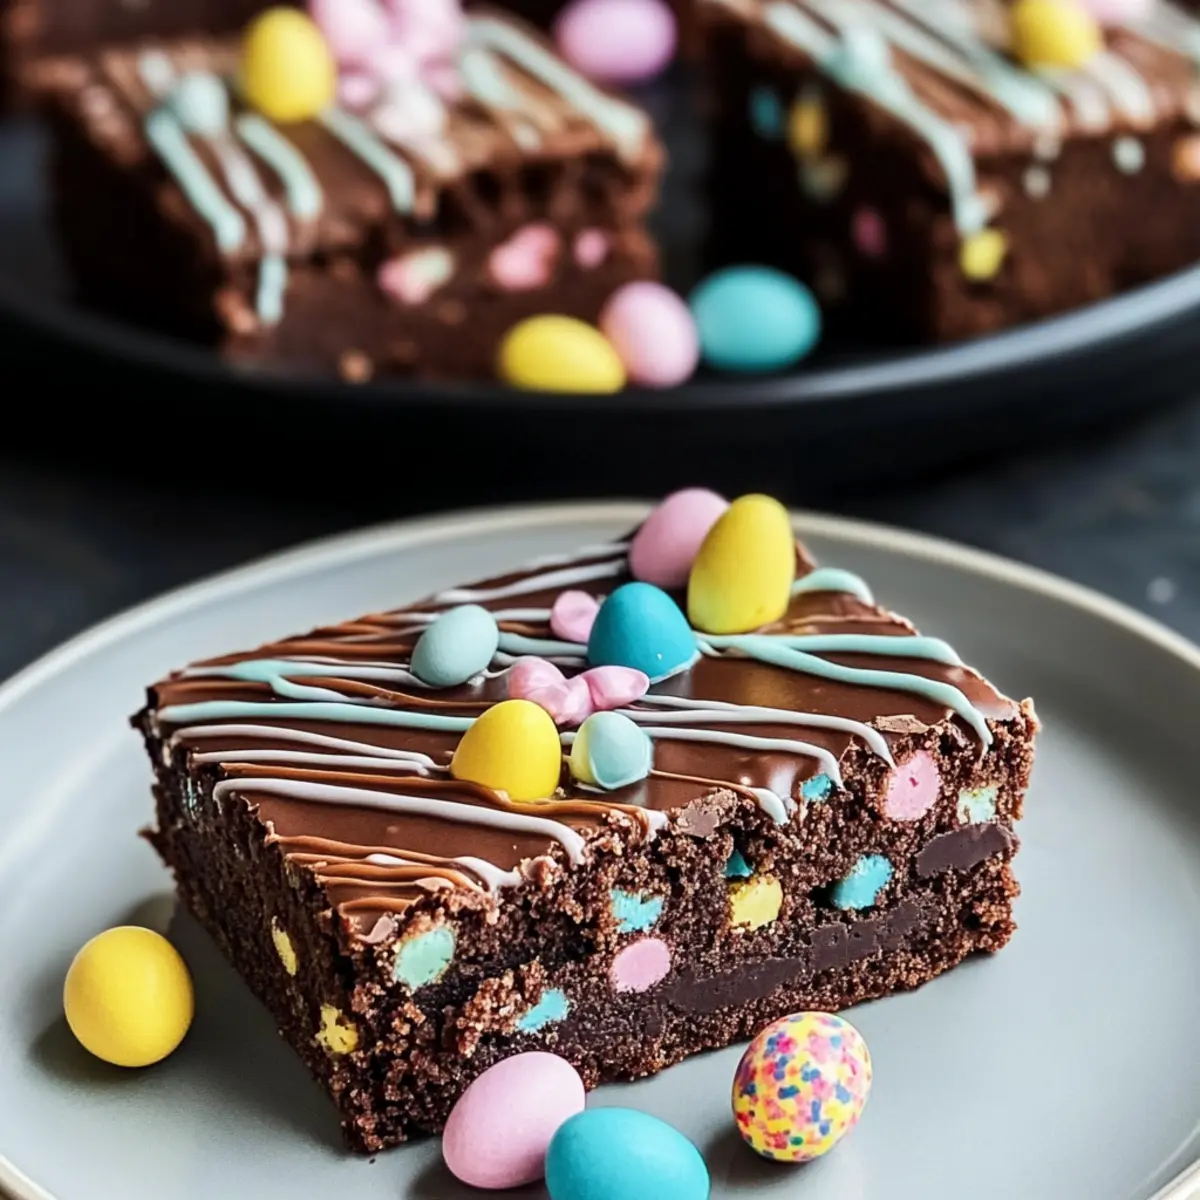
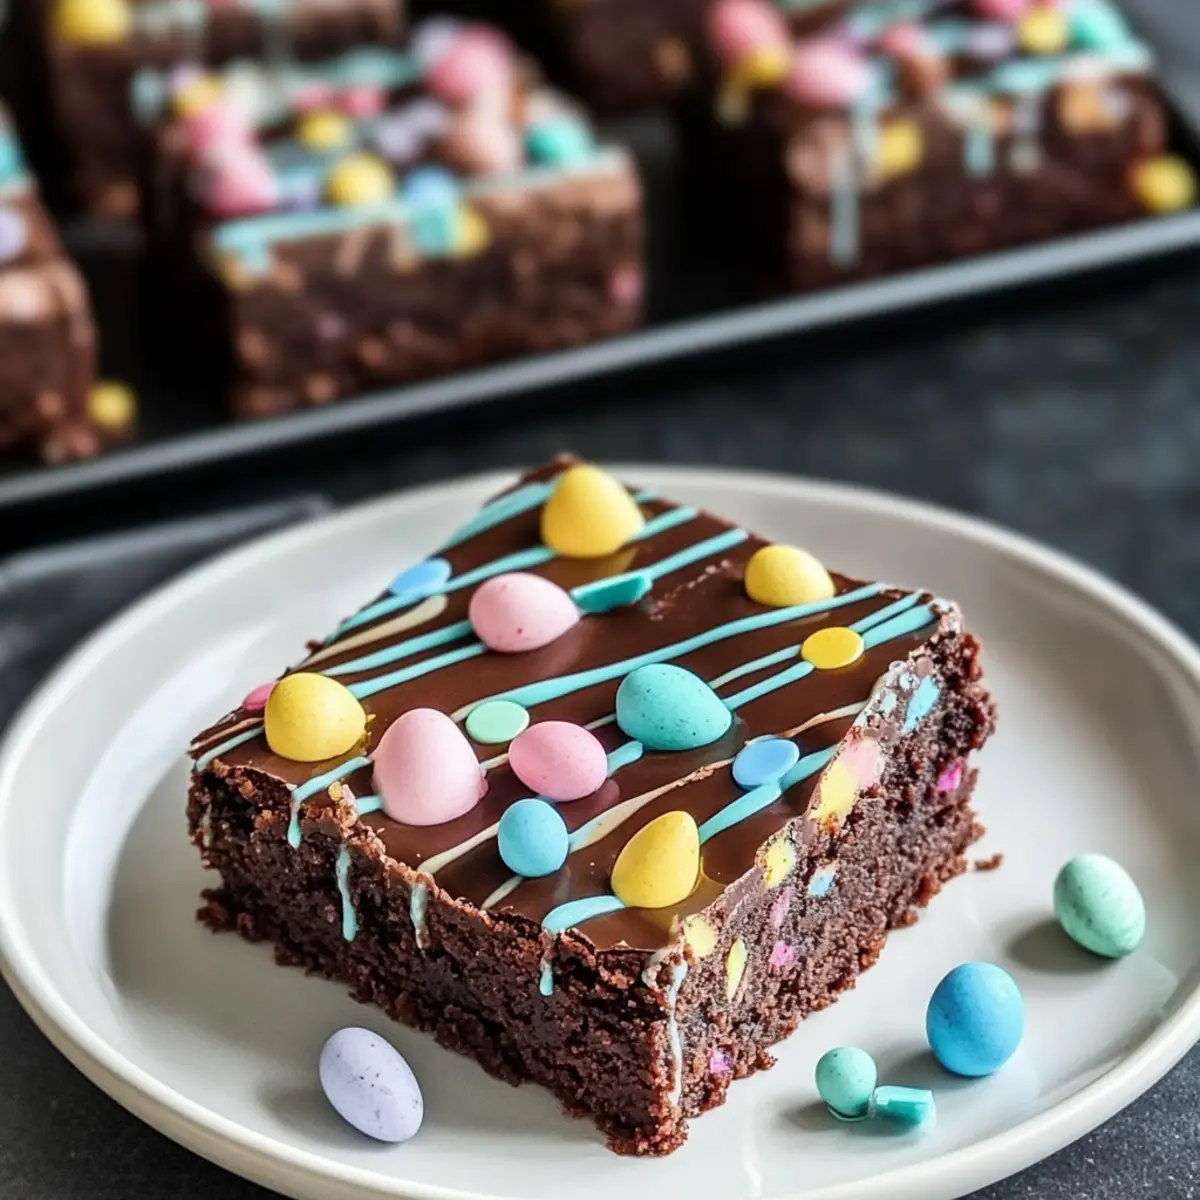
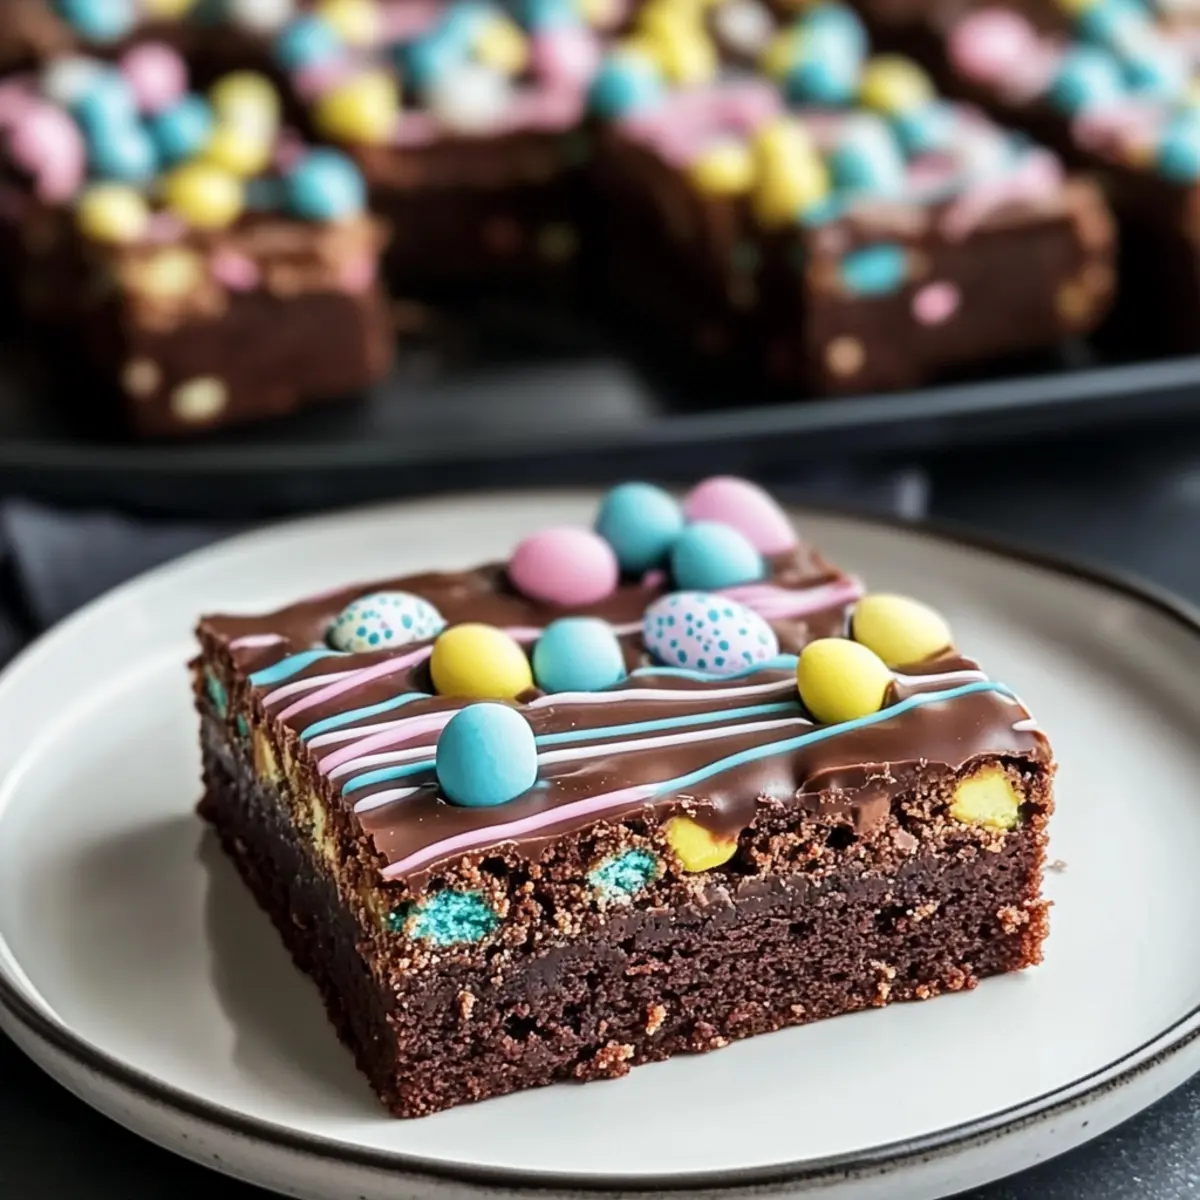
Once the brownies have completely cooled, pour the melted chocolate-topping over the surface, spreading it evenly. Use gel food coloring to mix vibrant pastel hues into melted white chocolate, then drizzle this color on top for a festive touch. Finish with sprinkles for a whimsical look, making your Easter brownies not only delicious but visually stunning for any gathering.

Make Ahead Options
These Easter Brownies are perfect for busy home cooks looking to save time during the festivities! You can prepare the brownie batter up to 24 hours in advance by mixing all the ingredients and storing it in an airtight container in the refrigerator. This keeps the mixture fresh while allowing the flavors to meld. Alternatively, you can bake the brownies ahead of time and store them at room temperature in an airtight container for up to 3 days or refrigerate for up to a week. When you’re ready to enjoy them, simply add the chocolate topping and decorative elements before serving. Your Easter Brownies will taste just as delicious, ensuring that your gatherings are both effortless and delightful!
Expert Tips for the Best Easter Brownies
-
Cool Before Topping: Allow your brownies to cool completely before adding the chocolate topping. This prevents the layer from melting and ensures a beautiful finish.
-
Use Gel Food Coloring: To achieve vibrant pastel hues for decorations, stick with gel food coloring. It won’t alter the consistency of the chocolate, keeping your Easter brownies looking perfect.
-
Warm Knife for Slicing: For clean cuts, warm a sharp knife under hot water before slicing. This helps maintain the decorated surface and prevents the toppings from smudging.
-
Boost the Flavor: A splash of cooled coffee or espresso can enhance the chocolate flavor in your brownies without imparting a coffee taste. It’s a delightful secret that elevates your Easter brownies recipe!
-
Experiment with Toppings: Don’t be afraid to get creative! Swap some chocolate chips for nuts or use different types of chocolate for the topping. Mix it up to find your family’s favorite combination.
What to Serve with Easter Brownies?
These fudgy chocolate delights are the star of any spring celebration, inviting a feast of flavors to accompany their rich sweetness.
-
Vanilla Ice Cream: A scoop of smooth vanilla ice cream contrasts beautifully with the dense brownies, creating a delightful melt-in-your-mouth experience. The creamy texture balances the rich chocolate, making each bite a blissful treat.
-
Fresh Berries: Serve with a mix of strawberries, raspberries, and blueberries to add a burst of freshness. Their natural tartness cuts through the sweetness, providing a refreshing balance to the indulgent brownies.
-
Chocolate Milkshake: Pair with a rich chocolate milkshake for an extra dose of chocolatey goodness. The creamy, cold shake enhances the fudginess while inviting a nostalgic feel, perfect for sweet spring gatherings.
-
Whipped Cream: A dollop of freshly whipped cream brings a light, airy element to the dessert. It adds a lovely touch of sweetness and richness, enhancing the overall indulgence without overpowering the brownie flavor.
-
Coffee or Espresso: A warm cup of coffee or espresso elevates the chocolate experience. The deep, robust flavors of coffee intensify the chocolate notes, allowing the brownies to shine even brighter.
-
Marshmallow Fluff Dip: Serve with a bowl of fluffy marshmallow dip for a playful twist. The sweetness and velvety texture create a fun dipping experience that adds a whimsical layer to your Easter celebration.
-
Candied Nuts: Top the brownies with candied nuts for a delightful crunch. The sweetness of the nuts complements the chocolate, adding a rich, satisfying texture that will have everyone reaching for seconds.
-
Lemonade: A refreshing glass of lemonade balances the richness of the brownies, invigorating your palate. The bright, zesty notes of the drink offer a perfect contrast, bringing a hint of spring joy to every sip.
Indulge in the wonder of these pairings alongside your Easter Brownies recipe, and watch as they transform your dessert table into a celebration of flavors!
How to Store and Freeze Easter Brownies
Room Temperature: Store leftover brownies in an airtight container at room temperature for up to 3 days to maintain their fudgy texture and delicious flavor.
Fridge: If you’d like to extend their freshness, place the brownies in the refrigerator for up to 1 week. Just make sure they’re well-wrapped to prevent drying out.
Freezer: For longer storage, freeze the brownies in an airtight container or resealable bag for up to 3 months. Allow them to cool completely before freezing to ensure they keep their rich, fudgy consistency.
Reheating: When ready to enjoy, let the brownies thaw at room temperature or gently reheat them in the microwave for a few seconds until warmed through. Enjoy the delightful flavors of this Easter brownies recipe!
Easter Brownies Recipe Variations
Feel free to put your own spin on these delightful brownies! Whether you want to adjust flavors or accommodate dietary preferences, there’s something here for everyone.
-
Nutty Twist: Substitute half of the chocolate chips with chopped walnuts or pecans for a crunchy texture. The added nuts complement the fudginess beautifully.
-
Flavored Extracts: Swap vanilla for almond or mint extract to create a unique twist in flavor. Imagine the delightful surprise of a chocolate-mint brownie!
-
Gluten-Free Option: Use a gluten-free flour blend in place of all-purpose flour for a delicious, gluten-free alternative. This way, everyone can enjoy your festive treats!
-
Decadent Dark Chocolate: Experiment with dark chocolate chips instead of semi-sweet to achieve a richer flavor profile. Perfect for dark chocolate lovers!
-
Drizzle with Caramel: Top your brownies with a warm drizzle of caramel sauce for an extra indulgent layer. This sweet addition will make every bite more heavenly.
-
Add Some Spice: Enhance the brownie mixture with a pinch of cayenne pepper or cinnamon for a warm, unexpected depth. A little heat can elevate your chocolate experience!
-
Coconut Flakes: Mix in sweetened coconut flakes for a tropical flair that brings a new texture to your brownies. This will create a delicious contrast with the rich brownie base.
As you let your creativity flow, you might also be inspired to try your hand at making Neapolitan Cake or a scrumptious Fried Chicken Sandwich as other comforting homemade delights to share with your family!
Easter Brownies Recipe FAQs
What type of butter should I use for the brownies?
Use unsalted butter for your Easter brownies recipe to have better control over the saltiness. Unsalted butter allows you to adjust the salt content according to your taste while retaining that rich, creamy flavor that makes the brownies so indulgent.
How should I store these brownies?
Store your Easter brownies in an airtight container at room temperature for up to 3 days. If you need to keep them longer, they will stay fresh in the refrigerator for up to a week. Just ensure they’re well-wrapped to prevent drying out!
Can I freeze Easter brownies?
Absolutely! To freeze your brownies, allow them to cool completely after baking. Then, cut them into squares and place them in an airtight container or resealable bag. They can be frozen for up to 3 months. When you’re ready to enjoy, thaw them at room temperature or gently reheat in the microwave.
Why did my brownies come out dry or crumbly?
This can happen if they were overbaked or if the ingredient ratios were off. To check for doneness, use a toothpick to ensure it comes out with just a few moist crumbs, indicating they are baked perfectly. If you find them dry, always keep an eye on the baking time in your oven!
Can I substitute ingredients to make these brownies gluten-free?
Absolutely! For a gluten-free option, substitute the all-purpose flour with a gluten-free flour blend. Many brands work wonderfully and preserve the texture and flavor of your Easter brownies. Just be sure to check that all your other ingredients are also gluten-free.
Are these brownies suitable for a vegan diet?
To make this Easter brownies recipe vegan, you can replace the eggs with flaxseed meal (1 tablespoon mixed with 2.5 tablespoons of water for each egg) and use a vegan butter alternative. Ensure your chocolate chips and other ingredients are dairy-free as well. Enjoy a delicious, dairy-free treat!
Easter Brownies Recipe: Fudgy Chocolate Delights for Spring Fun
Ingredients
Equipment
Method
- Melt 1 cup of butter in a medium saucepan over low heat for 2-3 minutes. Stir until completely liquid and bubbling.
- Mix in 1 cup of granulated sugar and 1 cup of brown sugar until smooth and glossy.
- Allow mixture to cool, then add 4 large eggs one at a time and 1 teaspoon of vanilla extract, blending until silky.
- Sift together 1 cup of flour, ½ cup of cocoa powder, and ½ teaspoon of salt. Fold into the wet mixture until no flour streaks remain.
- Gently fold in 1 cup of chocolate chips until evenly distributed.
- Pour batter into a lined 9x13 inch pan and bake at 350°F (175°C) for 30-35 minutes.
- Let brownies cool in the pan for about 20 minutes before preparing the topping.
- Melt 1 cup of chocolate with 2 tablespoons of coconut oil until smooth, then pour over cooled brownies.
- Decorate with gel food coloring and sprinkles as desired.
Leave a Reply