
The aroma of freshly baked bread has a way of weaving itself into our memories, doesn’t it? When it fills the kitchen, it creates an atmosphere that pulls everyone together, ready to savor something special. That’s precisely the magic of my recipe for “Not A Pie But Gold,” a rich yeast-risen dessert that beautifully merges comforting old-world flavors with modern-day simplicity. This delightful treat isn’t just easy to whip up; it’s also highly customizable, making it perfect for any festive gathering or cozy family meal. Whether you’re enjoying it warm with powdered sugar dusted on top or drizzled with syrup, you’ll find it becomes a new favorite in your baking repertoire. What toppings will you choose to make it your own?

Why Will You Adore This Dessert?
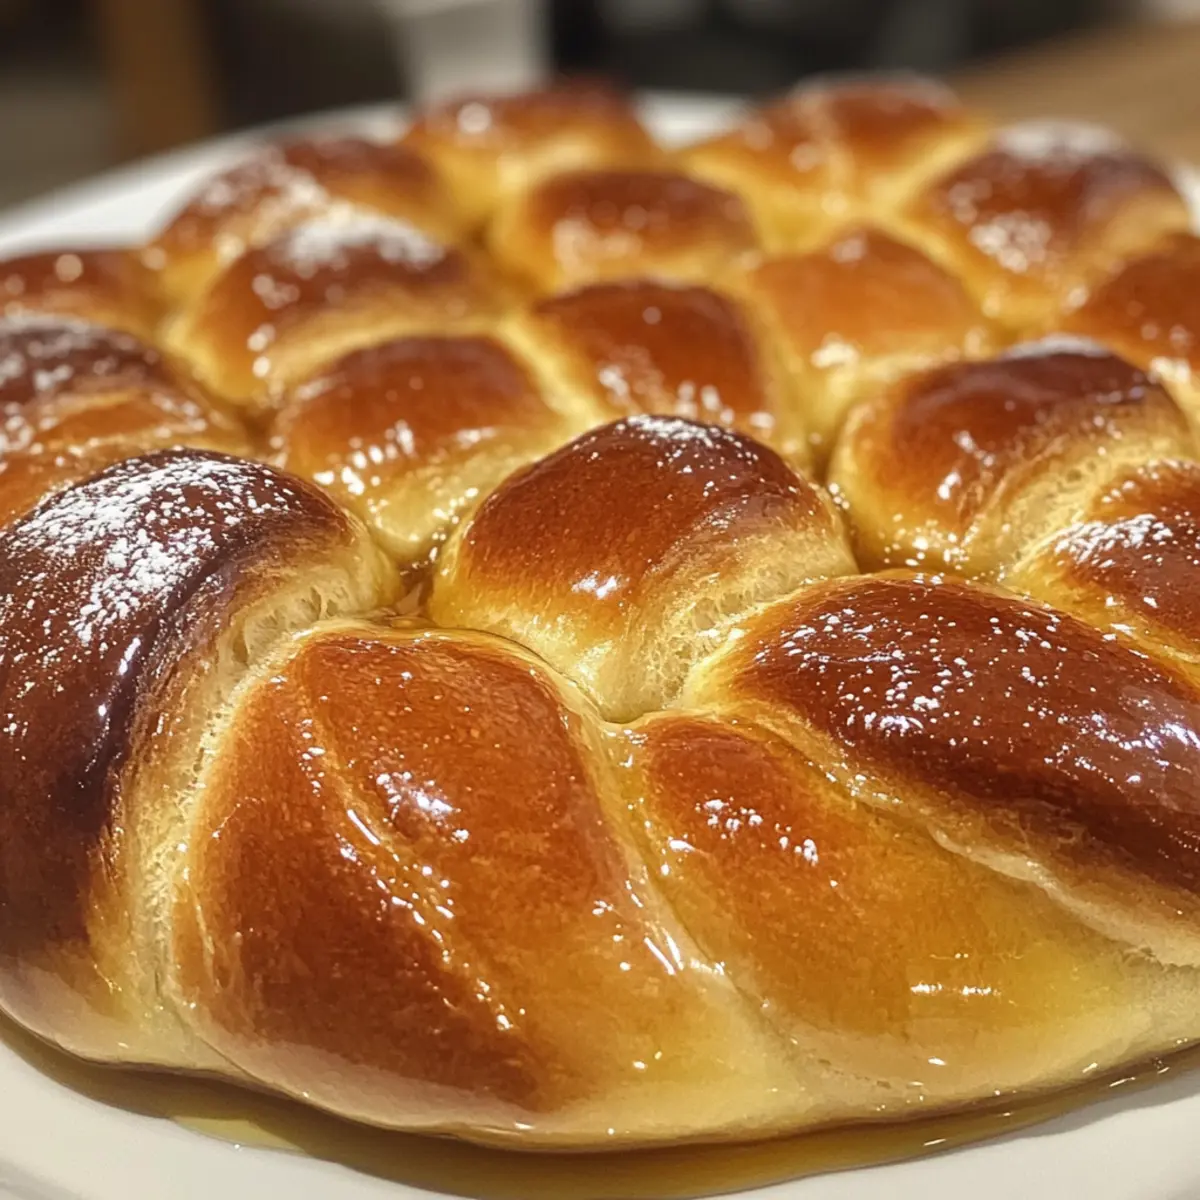
Irresistible aroma: The warm, sweet scent of freshly baked bread invites everyone to the table, setting the stage for beautiful memories.
Comforting tradition: “Not A Pie But Gold” melds Middle Eastern and European influences into a cozy treat that’s rich in cultural heritage.
Easy customization: Feel free to experiment with spices or toppings like nuts and fruit to create your unique spin.
Crowd-pleaser: This delightful dessert is sure to impress guests at dinner parties or family gatherings, just as a classic Boston Cream Pie would!
Warm indulgence: Best served fresh from the oven, it’s perfect to enjoy with tea or coffee for a truly comforting experience.
Simplicity: With simple ingredients and straightforward instructions, you’ll find it’s easy to master this delightful recipe.
Not A Pie But Gold Ingredients
A delightful mix of simple staples brings this lovely dessert to life!
For the Dough
- Active Dry Yeast – Leavens the dough for that fuzzy texture; using fresh yeast delivers the best results.
- Warm Milk (110°F/43°C) – Activates the yeast and enriches the dough; ensure it’s warm enough for yeast activation but not hot.
- Granulated Sugar – Sweetens the dessert while aiding yeast activation; feel free to substitute with honey for a unique flavor twist.
- All-Purpose Flour – Provides structure to this yeast dessert; essential for a good rise and a soft center.
- Salt – Enhances flavor and balances out the sweetness of the dough.
- Eggs – Adds moisture and richness to the dessert; can be replaced with flax eggs for a vegan option.
- Unsalted Butter – Contributes rich flavor and tenderness; dairy-free butter can be used for a plant-based alternative.
For the Spices
- Ground Cardamom or Cinnamon (optional) – Infuses aromatic spice notes; adjust based on personal taste.
For Serving
- Powdered Sugar or Syrup – A sweet finishing touch; feel free to drizzle with flavored syrups for added creativity.
Your journey to making “Not A Pie But Gold” awaits with these simple yet essential ingredients! Enjoy crafting this rich yeast-risen dessert that bridges culinary traditions.
Step‑by‑Step Instructions for Not A Pie But Gold
Step 1: Activate the Yeast
In a large mixing bowl, combine warm milk (around 110°F or 43°C) with granulated sugar and active dry yeast. Stir gently and let the mixture rest for 5 to 10 minutes until you see it foam and bubble. This confirms the yeast is active and ready to work its magic in your Not A Pie But Gold dessert.
Step 2: Mix the Dough Ingredients
Once the yeast mixture is foamy, add in the eggs and a pinch of salt. Gradually incorporate the all-purpose flour, mixing until all ingredients are well combined. The dough will be sticky at first, but don’t worry! This is normal as we prepare to knead it into a beautiful smooth texture.
Step 3: Knead for Perfection
Transfer the sticky dough onto a lightly floured surface and knead in softened unsalted butter along with any optional spices like ground cardamom or cinnamon. Knead for about 8 to 10 minutes until the dough feels smooth and elastic, bouncing back when gently pressed. This step is crucial for the rich texture of your Not A Pie But Gold.
Step 4: Let the Dough Rise
Place the kneaded dough in a greased bowl, turning it to coat with oil. Cover the bowl with a clean kitchen towel and let it rise in a warm spot for 1 to 1.5 hours, or until it doubles in size. You’ll know it’s ready when it has a soft, puffy look, signifying that the yeast has worked well.
Step 5: Shape the Dough
After the dough has risen, punch it down gently to release air, then shape it into braids, rings, or rolls—your choice! Each shape will influence the final look of your Not A Pie But Gold, so feel free to get creative! Ensure the shapes are uniform for even baking.
Step 6: Final Rise
Place your shaped dough in a greased baking dish, making sure to leave enough space between pieces. Cover again and allow it to rise for an additional 30 to 45 minutes until it is nicely puffed up. This final rise is key to achieving that airy texture in your sumptuous dessert.
Step 7: Bake to Perfection
Preheat your oven to 350°F (175°C). Once the dough has risen sufficiently, bake it in the preheated oven for 25 to 30 minutes. The dessert is ready when it turns a glorious golden brown and sounds hollow when tapped lightly on the bottom.
Step 8: Serve and Enjoy
Remove the baked Not A Pie But Gold from the oven and allow it to cool slightly. Dust the top with powdered sugar or drizzle with syrup for that finishing touch. This delightful treat is best enjoyed warm, making it an inviting centerpiece at any gathering.

Make Ahead Options
“Not A Pie But Gold” is a fantastic choice for meal prep enthusiasts looking to save time during busy days! You can prepare the dough up to 24 hours in advance by mixing your ingredients and letting it rise. After the first rise, punch it down and shape it as desired, then cover tightly with plastic wrap and refrigerate. This helps develop flavors while keeping the dough fresh. When you’re ready to finish, simply remove it from the refrigerator and allow it to come to room temperature for about 30 minutes before completing the final rise and baking. Trust me, it will be just as delicious and perfect for surprising guests with minimal effort!
What to Serve with Not A Pie But Gold
Imagine enhancing your baking experience with delightful pairings that elevate your yeast-risen dessert into a truly memorable meal.
-
Creamy Mashed Potatoes: This savory side adds a contrast of textures, balancing the sweetness of the dessert perfectly. The velvety richness is an inviting alternative to traditional pies.
-
Fresh Fruit Salad: A citrusy, refreshing fruit salad can cleanse the palate between bites of dessert, while adding vibrant colors and flavors. Including seasonal fruits introduces a burst of freshness.
-
Steamed Green Beans: These lightly salted veggies offer a crisp texture that contrasts beautifully with the pillowy softness of your “Not A Pie But Gold.” Add a drizzle of lemon for brightness!
-
Rich Vanilla Ice Cream: The creamy, cool sensation of vanilla ice cream melting over the warm dessert creates a delightful contrast. It’s a classic combination that elevates any sweet treat!
-
Cardamom Tea: A warm cup of aromatic cardamom tea complements the spices in your dessert, while providing a soothing finish to the meal. It ties the whole experience together beautifully!
-
Chocolate Sauce: Drizzle warm chocolate sauce over your “Not A Pie But Gold” to intensify the flavors, offering a luxurious, decadent touch to this already delightful dessert.
With these thoughtful pairings, each bite of your dessert can be harmoniously balanced with a medley of flavors and textures, inviting deeper enjoyment.
Storage Tips for Not A Pie But Gold
Room Temperature: Store leftover Not A Pie But Gold in an airtight container at room temperature for up to 3 days for optimal freshness.
Freezer: For longer storage, freeze the unglazed dessert wrapped tightly in plastic wrap and aluminum foil for up to 3 months. Glaze when ready to serve.
Reheating: To reheat, warm individual pieces in the microwave for about 20 seconds or in the oven at 350°F (175°C) for 10-15 minutes until warmed through.
Serving Notes: Always add powdered sugar or syrup just before serving to maintain the delightful texture of your rich yeast-risen dessert.
Expert Tips for Not A Pie But Gold
- Activate Properly: Ensure the yeast is foamy before adding to the dough; inactive yeast won’t rise, leaving you with a dense dessert.
- Knead Well: Knead the dough thoroughly to develop gluten, which gives “Not A Pie But Gold” its delightful texture. A smooth, elastic dough is key!
- Avoid Sogginess: Glaze or dust with powdered sugar only before serving to maintain that perfectly soft texture without becoming soggy.
- Flavor Variations: Don’t hesitate to add fillings like nuts, dried fruit, or chocolate; they can elevate the flavor and add texture.
- Storage Tips: Store leftovers in an airtight container at room temperature, without the glaze. Reapply glaze just before serving to keep it fresh.
Not A Pie But Gold Variations
Feel free to explore these exciting variations to make “Not A Pie But Gold” uniquely yours!
-
Gluten-Free: Use a gluten-free flour blend to create a version that’s safe for those with gluten sensitivities, keeping all the warm flavors intact. You won’t miss the texture with the right mix!
-
Spice Swap: Replace cardamom or cinnamon with nutmeg or ginger for a refreshing twist that adds warmth and zest to each bite. Each spice brings its own allure to the mix!
-
Fruit-Infused: Incorporate chopped fruits like apples or dried raisins into the dough for a delightful burst of flavor. It elevates the dessert, making every slice a mini celebration.
-
Chocolate Lovers: Add chocolate chips either into the dough or on top for a decadently sweet finish. This delightful twist invites the rich embrace of chocolate to complement the breadiness.
-
Vegan Delight: Replace eggs with flax eggs and use dairy-free butter for a completely plant-based version. It retains its soft texture while accommodating vegan guests!
-
Savory Spin: Experiment by omitting sugar and adding cheese or herbs for a savory take. This can take the dessert down a different path, giving it versatility for every occasion.
-
Syrup Twist: Try different flavored syrups like maple or caramel to drizzle on top. This simple swap creates a new, delightful experience each time you serve it!
-
Layering Excellence: For a luxurious touch, layer the dough with cream cheese or mascarpone before shaping. Each bite will have creamy richness perfect for a special occasion.
As you can see, the possibilities are endless! If you’re in the mood for a comforting dessert, don’t forget to pair this with a warm cup of tea or coffee, just like you would with a sumptuous Salted Honey Pie or a savory Slow Cooker Chicken Pot Pie. Happy baking!

Not A Pie But Gold Recipe FAQs
What type of yeast should I use for Not A Pie But Gold?
I recommend using active dry yeast for this recipe, as it provides great results. Ensure it’s fresh and within the expiration date for best activation. If you prefer, you can also use instant yeast; just follow the same measurements without needing to activate it beforehand.
How should I store leftover Not A Pie But Gold?
Leftovers can be stored in an airtight container at room temperature for up to 3 days. Ensure that the container is sealed properly to avoid drying out. For longer storage, freeze the unglazed dessert wrapped in plastic wrap and then in aluminum foil for up to 3 months. When you’re ready to enjoy it again, glaze just before serving.
Can I freeze Not A Pie But Gold?
Absolutely! To freeze, let the dessert cool completely, then wrap it tightly in plastic wrap followed by aluminum foil. It will keep well in the freezer for up to 3 months. Simply thaw it in the refrigerator overnight, and warm individual pieces in the microwave or oven before serving.
How can I tell if my dough has risen enough?
Great question! You’ll know your dough is ready when it has doubled in size and feels soft and airy. Gently poke your finger into the dough; if the indentation remains and doesn’t bounce back immediately, it’s ready for shaping. If it springs back quickly, give it more time to rise.
Are there any dietary considerations for Not A Pie But Gold?
Yes! This recipe is vegetarian and can easily be made vegan by substituting the eggs with flax eggs (1 tablespoon of flaxseed meal mixed with 3 tablespoons of water for each egg) and using dairy-free butter. Always check the ingredients to ensure they meet your dietary needs, especially if you’re serving guests with allergies or specific diets.
What should I do if my dough is too sticky?
If you find your dough is too sticky while kneading, sprinkle in a bit more flour, one tablespoon at a time, until it reaches a smooth and elastic consistency. However, be careful not to add too much flour as it can alter the texture of your dessert. Remember, a little stickiness is normal for yeast dough and indicates that it’s hydrating properly!
Not A Pie But Gold: A Cozy Yeast-Risen Delight
Ingredients
Equipment
Method
- In a large mixing bowl, combine warm milk with granulated sugar and active dry yeast. Stir gently and let the mixture rest for 5 to 10 minutes until foamy.
- Once the yeast is foamy, add eggs and salt. Gradually mix in all-purpose flour until well combined.
- Transfer sticky dough to a floured surface and knead in softened unsalted butter and any optional spices. Knead for 8 to 10 minutes until smooth and elastic.
- Place dough in a greased bowl, turning to coat with oil. Cover and let rise in a warm spot for 1 to 1.5 hours until doubled in size.
- Punch down the dough and shape it into braids, rings, or rolls. Ensure uniform shapes.
- Place shaped dough in a greased baking dish, cover, and allow to rise for an additional 30 to 45 minutes.
- Preheat oven to 350°F (175°C). Bake for 25 to 30 minutes until golden brown.
- Remove from oven and cool slightly. Dust with powdered sugar or drizzle with syrup before serving.
Leave a Reply